How Can We Help?
How to Build a Future Events Pipeline
Cortex is an easy-to-use platform that enables anyone to automate Machine Learning Pipelines from continuous streams of event data. In this guide, we’ll show you how to predict the future behavior of your users using Future Events pipelines in Cortex.
What are Future Events pipelines?
Predictions from a Future Events pipeline answer the question: how likely is each user to perform a certain action, or set of actions, in a specified time range? The actions available to predict come directly from the data being ingested into Cortex. Every event action that is being tracked and sent to Cortex can be used to power a Future Events pipeline prediction.
Note that while we’ll be using the example of predicting future user behavior, your Cortex account can be configured to make predictions about any type of object tied to your event data (e.g. commerce items, media content, home listings, etc.).
When should I use Future Events pipelines?
The key feature of Future Events pipelines is their ability to predict event-based outcomes for each object in the future. The following diagram will help explain which pipeline type is best suited for different predictions.
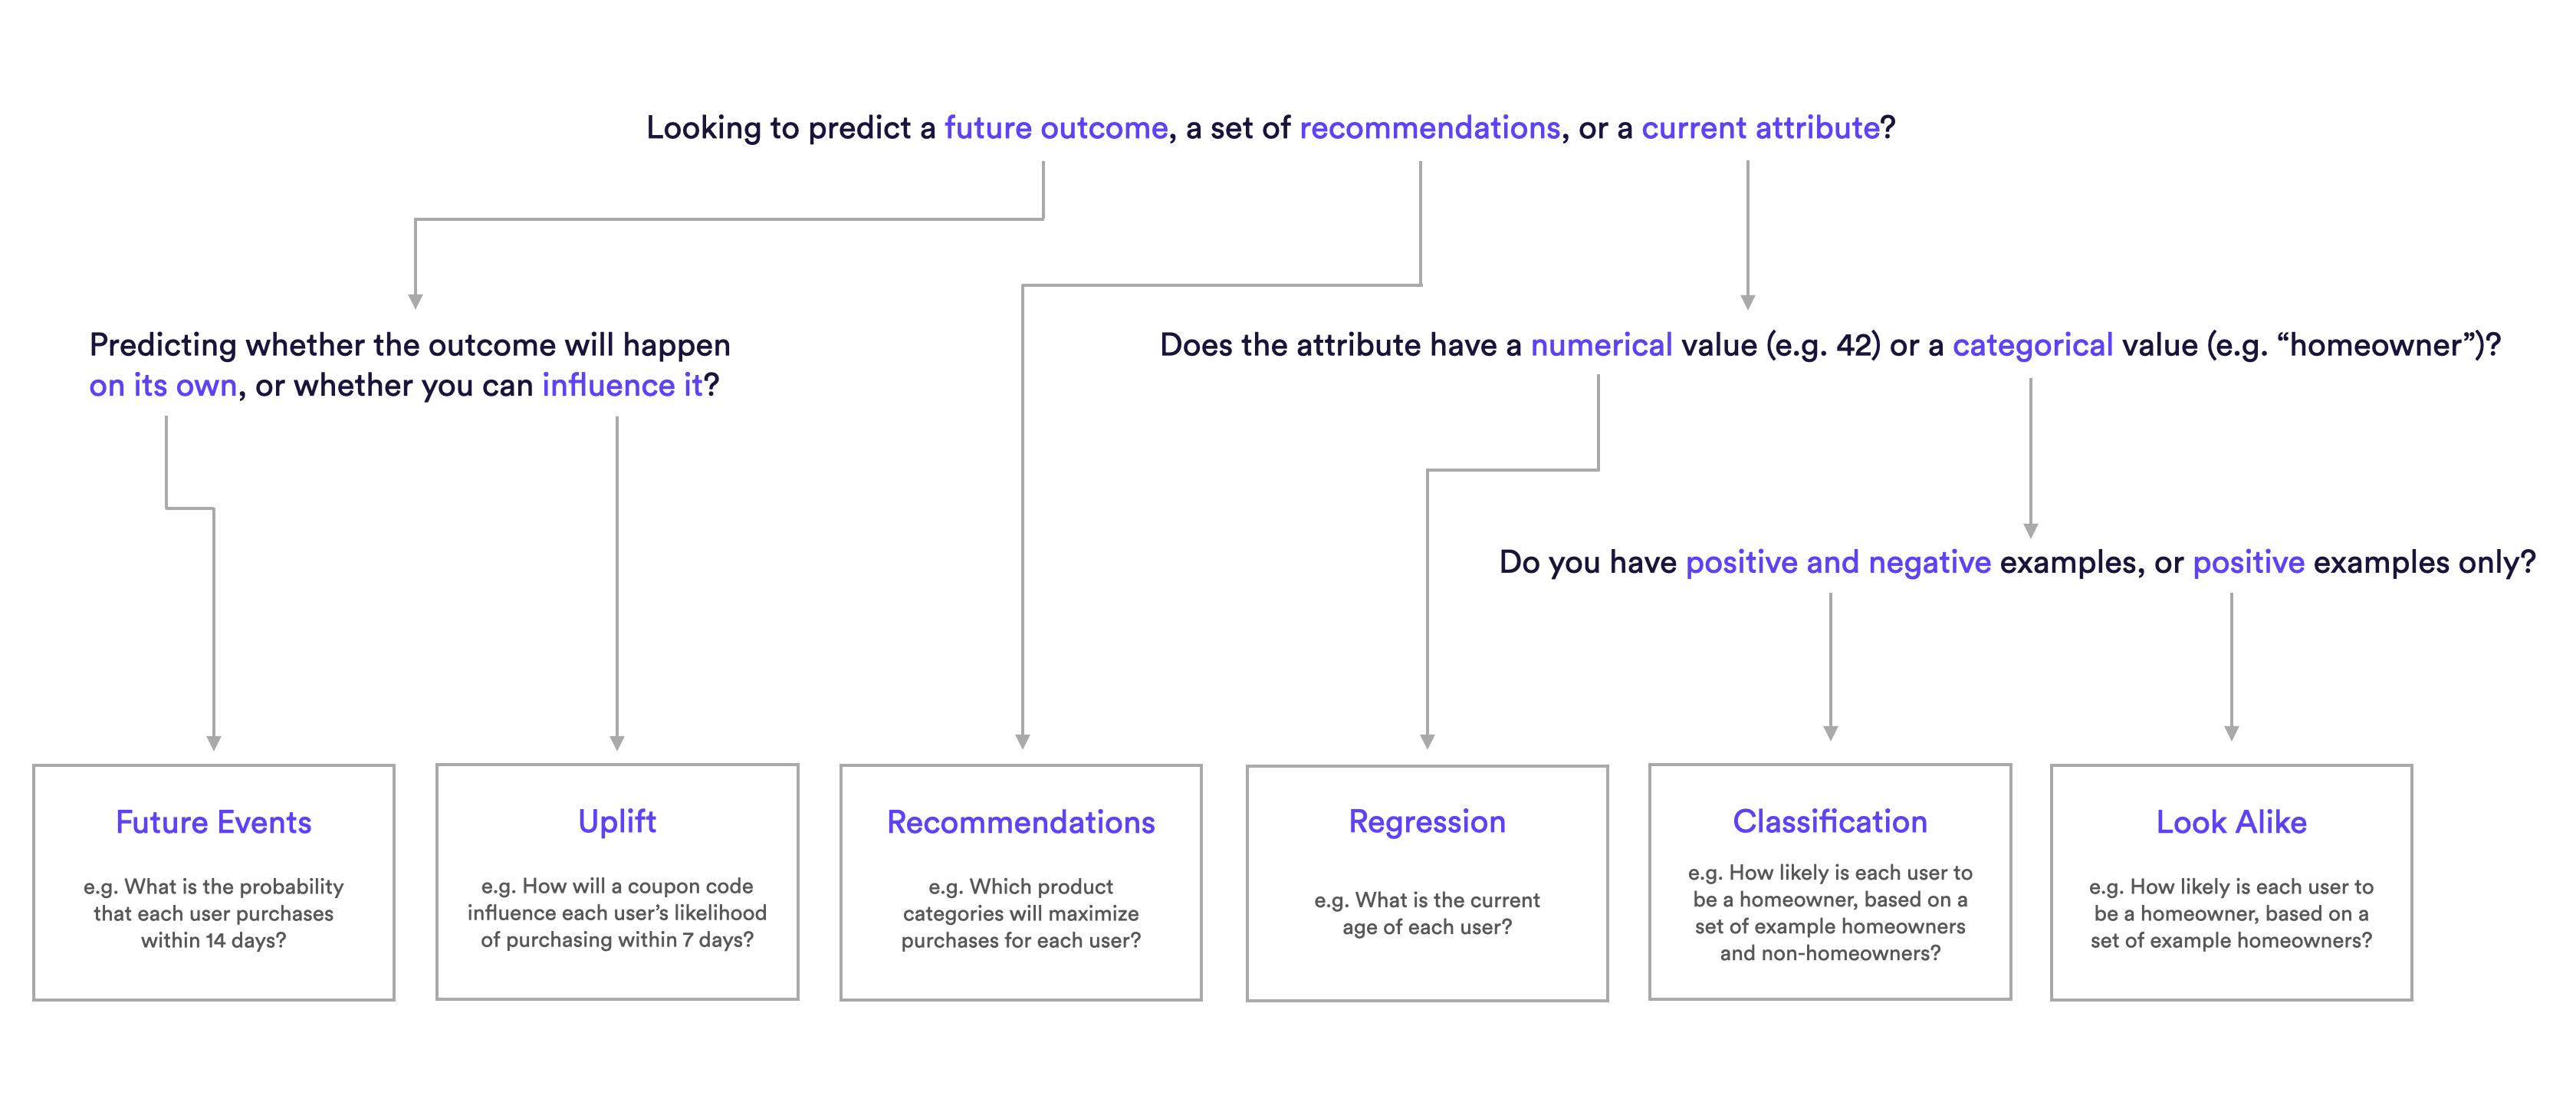
What are Examples of Future Events pipelines?
Future Event Pipeline Examples
- What is the probability that each user purchases from category “shoes” within 7 days?
- What is the probability that each user will take any action within the next 30 days?
- What is the probability each Visitor to our site will Subscribe?
- What is the probability a Lapsed User will Resubscribe?
How do I build these pipelines in Cortex?
Future Events pipelines can be configured to make predictions in one of two ways:
- Batch – fresh predictions are re-generated for every user on a recurring schedule (e.g. weekly)
- Real-Time – fresh predictions are re-generated on-demand and in real-time as new event data is recorded for a given user
The process of building a Future Events pipeline is slightly different depending on which method you’d like to use to generate predictions over time. Expand the sections below for a step-by-step walkthrough of how to build either a Batch or Real-Time Future Events pipeline.
Batch Future Events
How to build a Batch Future Events pipeline
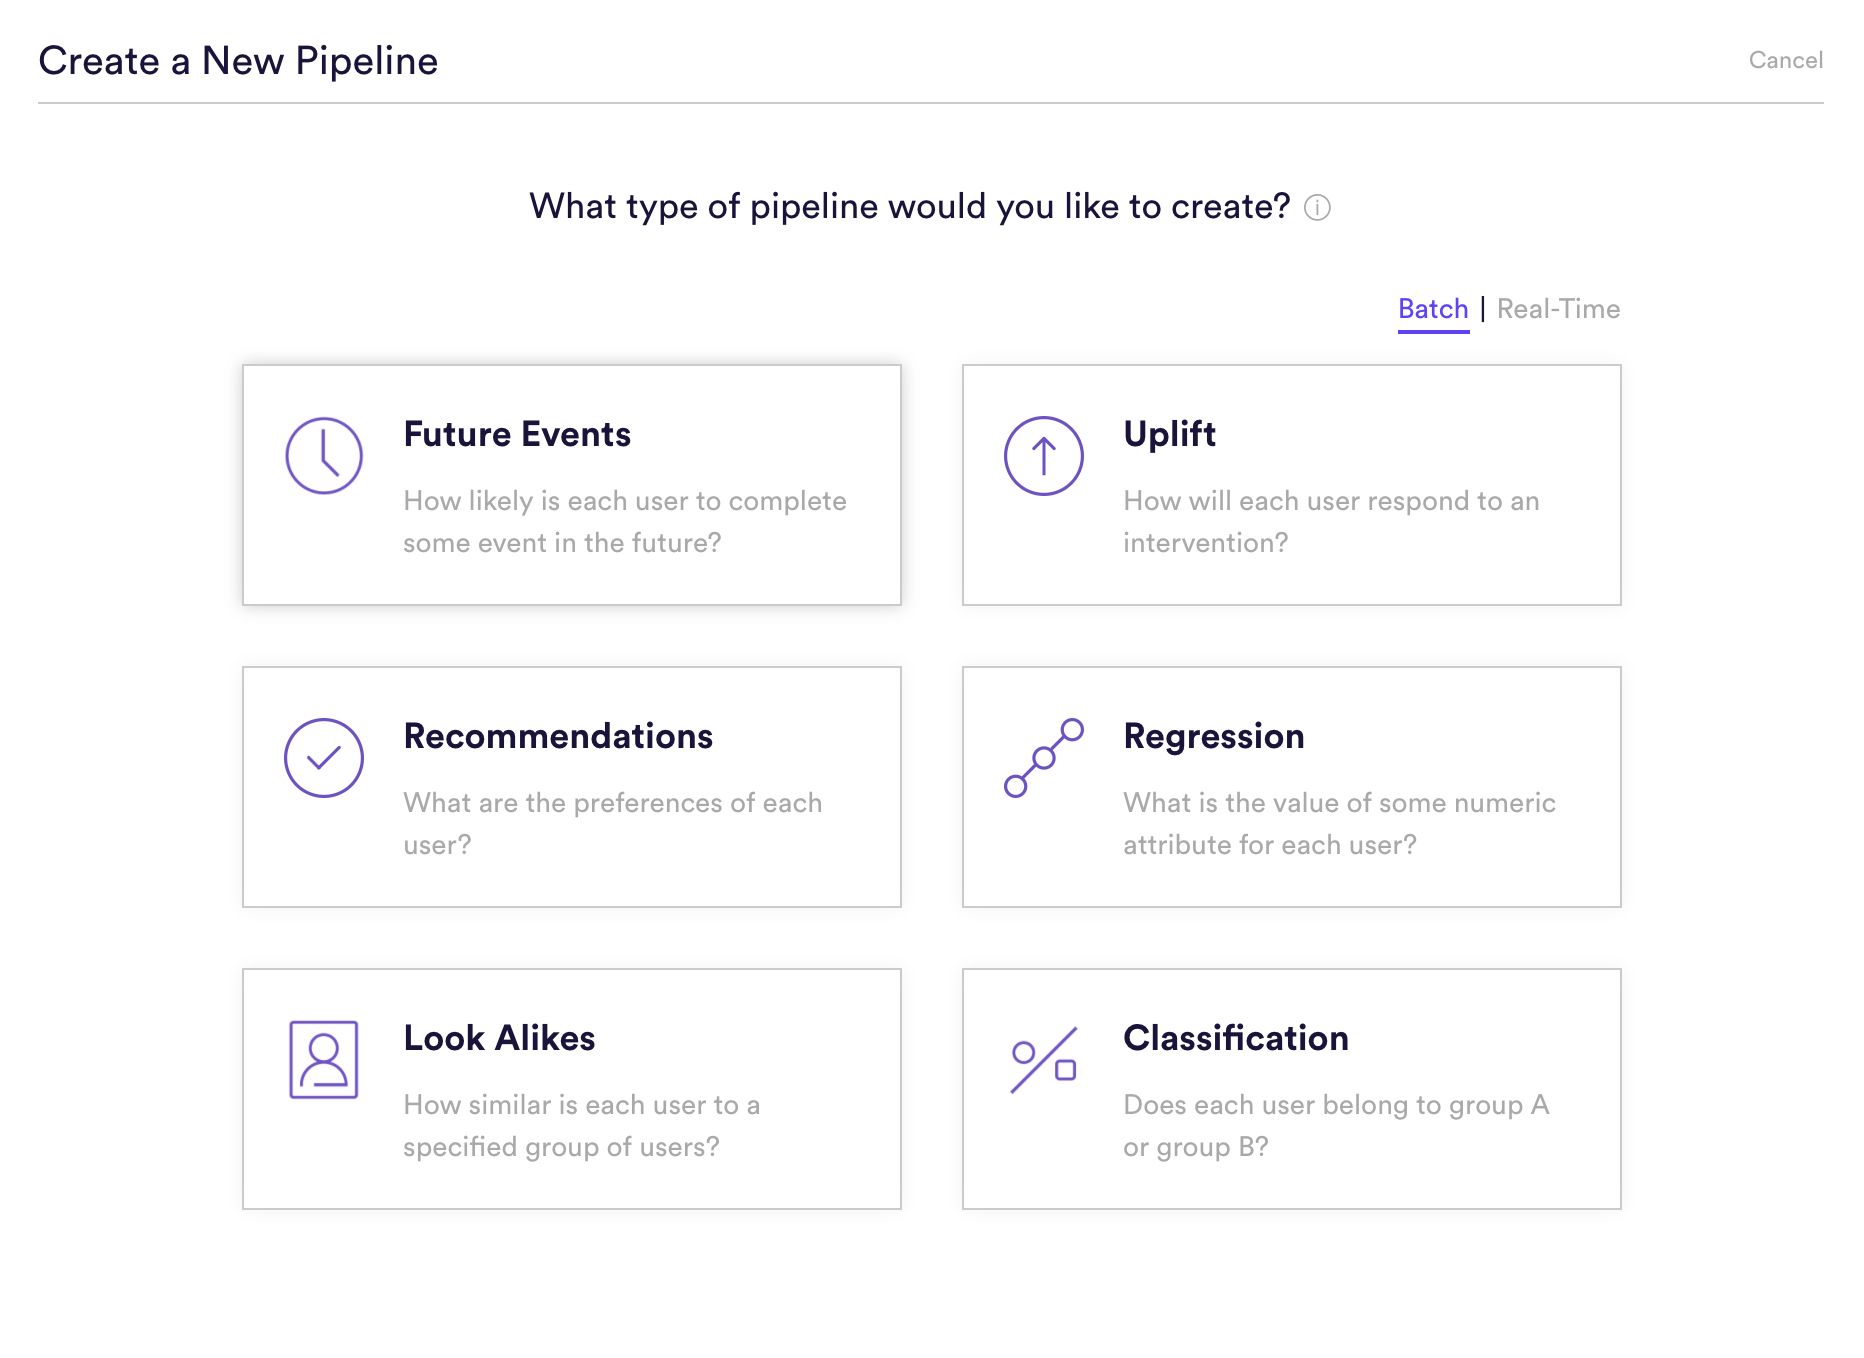
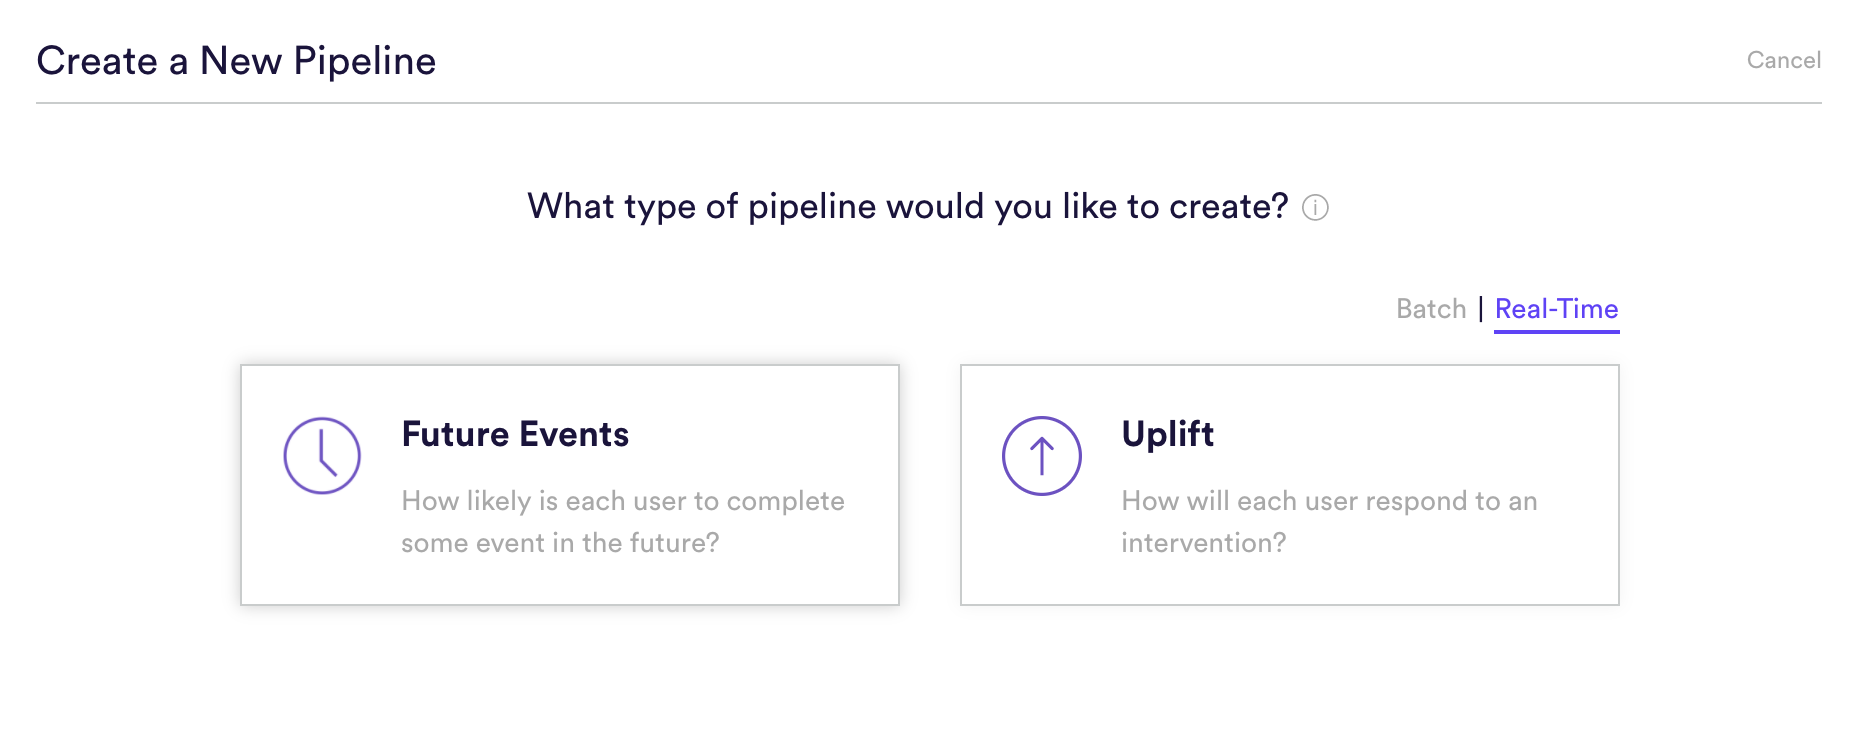
Step 1: Choose Pipeline Type
Select ‘Create New Pipeline’ from within your Cortex account. Make sure that the “Batch | Real-Time” toggle is set to “Batch”, and choose the Future Events pipeline type.
Step 2: Define Events
Future Events pipelines are used to predict the probability that some event happens in the future for each of your data points. Defining that event means providing four pieces of information to Cortex: (A) happens (B) or more times where (C) within (D) days.
- (A) Event Type: The type of event that your pipeline should predict. These event types are based on the data being ingested into Cortex.
- (B) Frequency: The minimum number of times the event must occur in order to count as a conversion. The default value is “1”, i.e. you are only predicting that a user will take this action once in the specified time range. However, if you are looking to predict if users will do an event multiple times, e.g. Predict how likely each user is to make 5 purchases, then you can increase the event frequency.
- (C) Event Conditions: Conditions (if any) under which the event must occur in order to count as a conversion. These event conditions are based on the data being ingested into Cortex.
- (D) Timeframe: The future window of time over which the event(s) should be predicted. For a batch Future Events pipeline, this window is specified as a fixed number of days. Common values here are 7 and 28 days if you are looking to predict behavior over the next week or month.
You can build a Future Events pipeline to predict any event that you can describe in this way using your data. Add any number of conditions to an event, or chain any number of distinct events together using AND/OR/IF operators. No matter how complex, your events will always read like an English sentence.
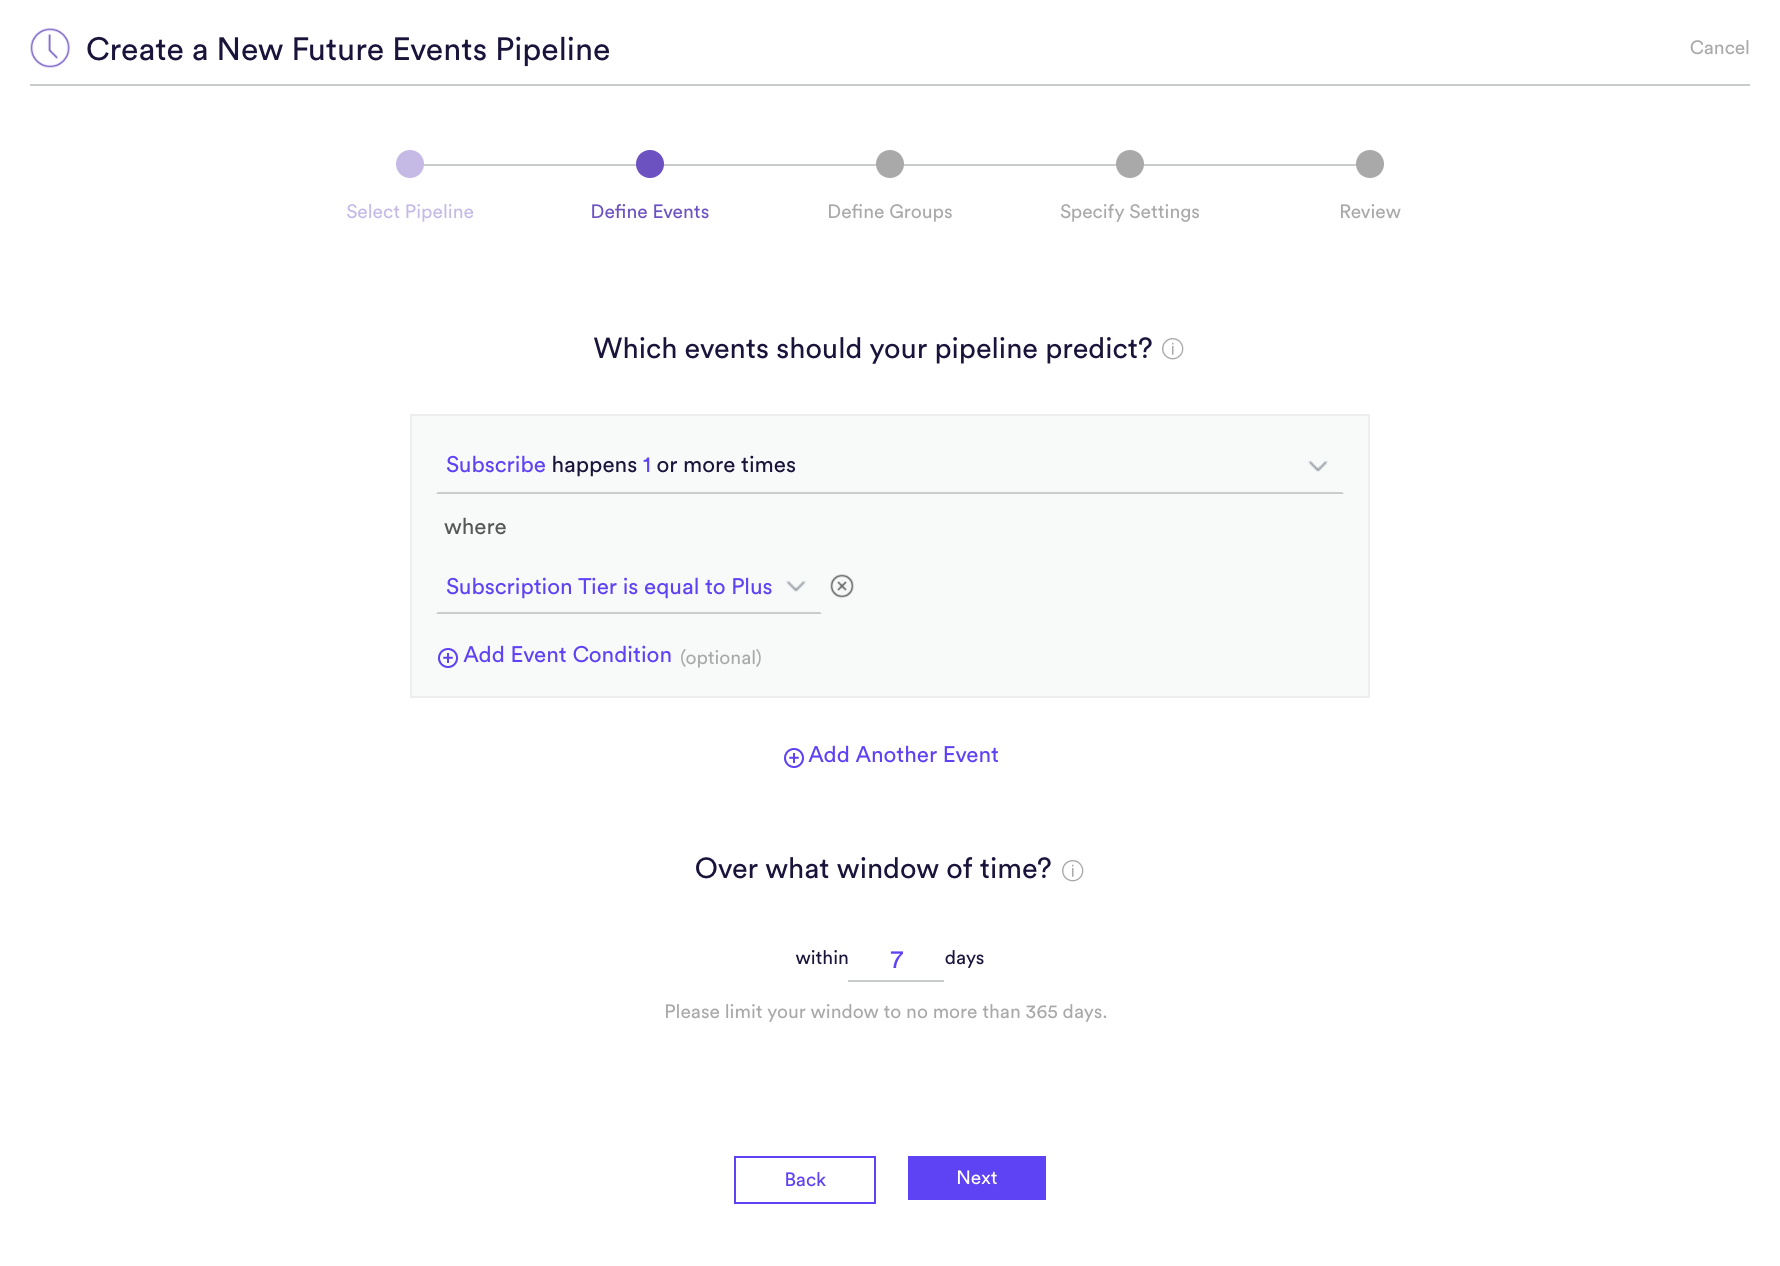
Below are a few examples based on e-commerce use cases:
- “Purchase happens 1 or more times OR Rent happens 1 or more times within 7 days”. This pipeline predicts the probability that each user will either purchase or rent within the next week. The OR clause may be useful if you plan to use the predictions to power a marketing newsletter which promotes movies available for both purchase and rental.
- “Purchase happens 1 or more times where Category is equal to Shoes AND Purchase happens 1 or more times where Category is equal to Pants within 14 days”. This pipeline predicts the probability that each user will purchase both shoes and pants within the next two weeks. The AND clause may be useful if you plan to use the predictions to power a marketing newsletter which promotes a both shoes and pants.
- “Purchase happens 1 or more times IF Login were to also happen 1 or more times within 7 days”. This pipeline predicts the probability that each user will purchase within the next week, assuming that the user first logs on and is active within that week. The IF clause may be useful if you plan to use the predictions to dynamically vary each user’s onsite experience. You don’t want the prediction about a user’s likelihood of purchasing to reflect their likelihood of being active in the first place, since the user is already active by the time you’re deciding which experience to show. Read this post for more info about these types of conditional goals.
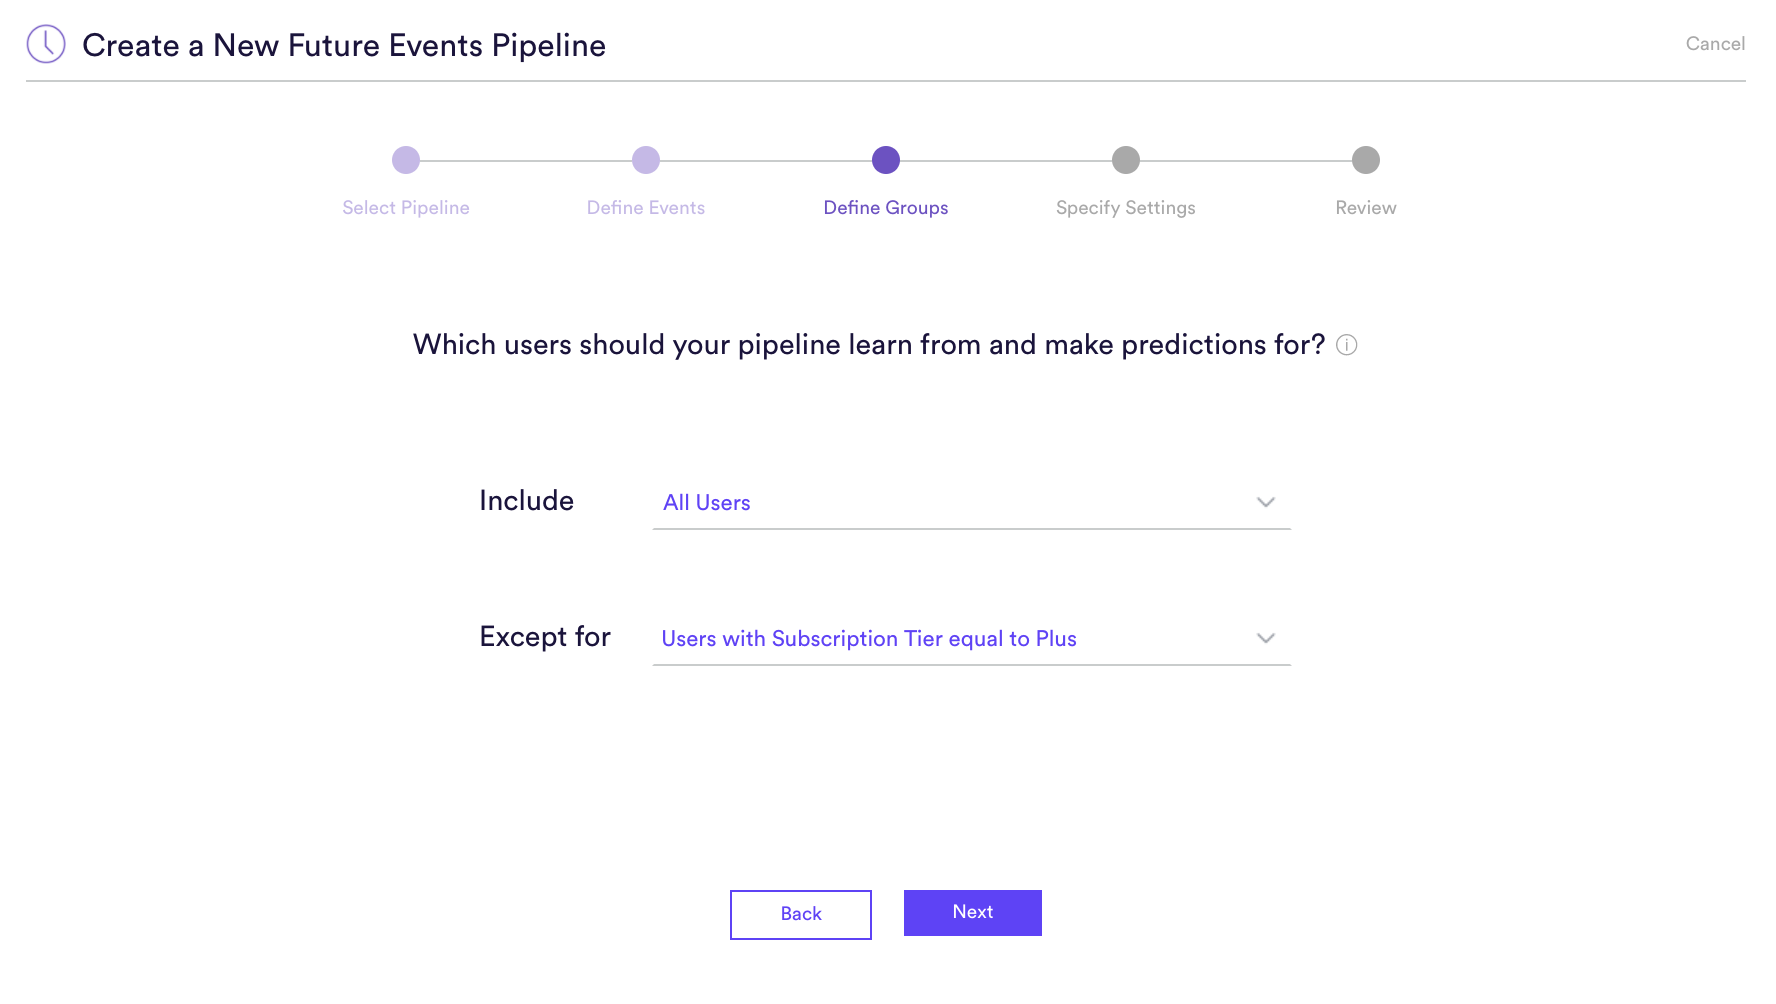
Step 3: Define Groups
Sometimes you are looking to make a prediction for every user in your system, while other times you want a prediction only for a certain group of users. By default, Future Events pipelines are set up to make a prediction for All Users. If you are looking to predict for All Users simply click Next to proceed to the next step.
If you are looking to limit the prediction group (for example, exclude current subscribers when predicting who is likely to subscribe), you can either include a specific group or exclude a specific group. Like events in step 2, the user attribute values available come directly from the data being ingested by Cortex.
Note that having an Include or Exclude group will also limit the model training for only those groups of users, ensuring that the behavior of users outside of this group doesn’t negatively affect the model.
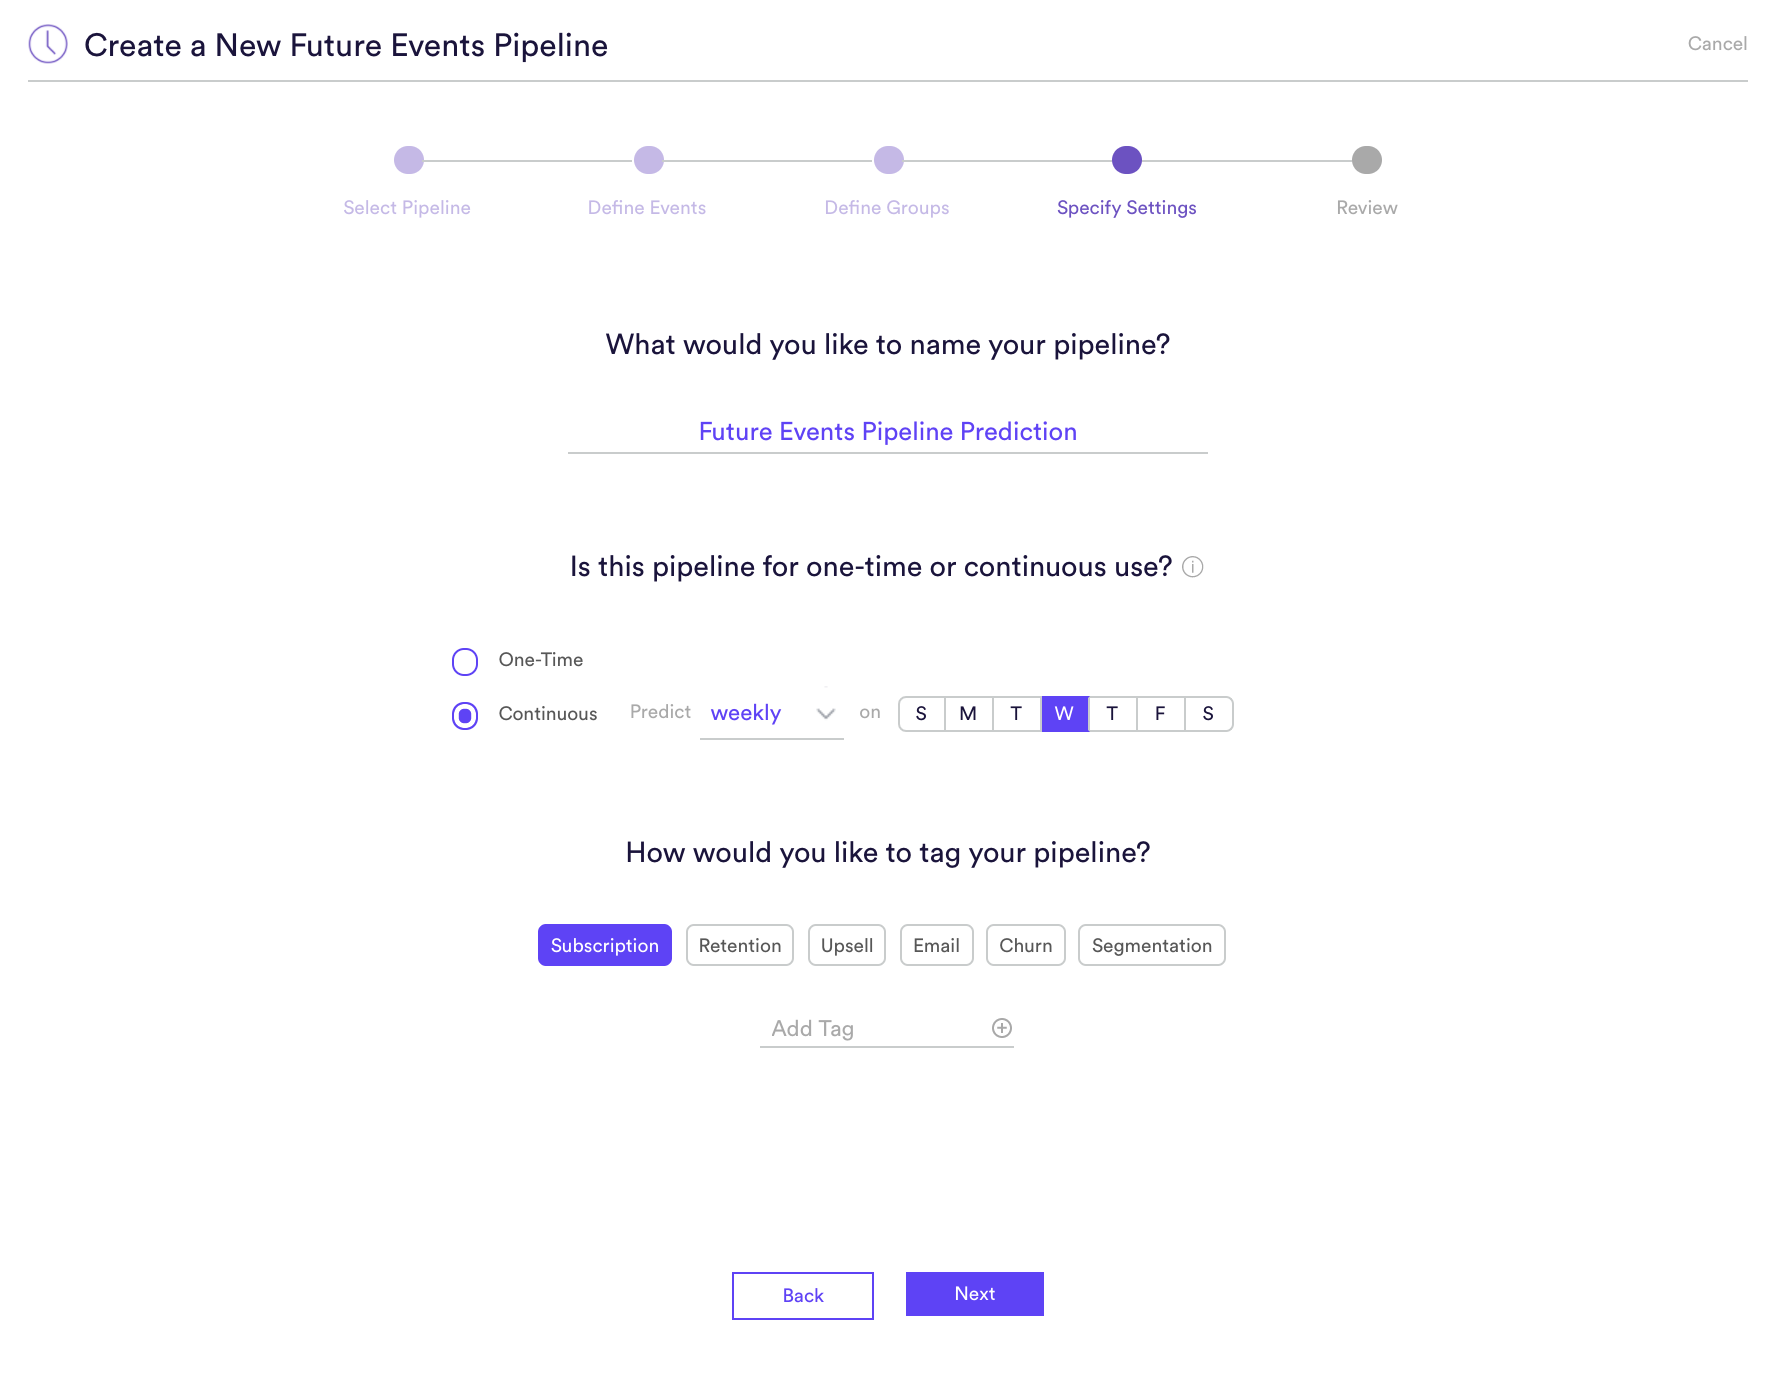
Step 4: Specify Settings
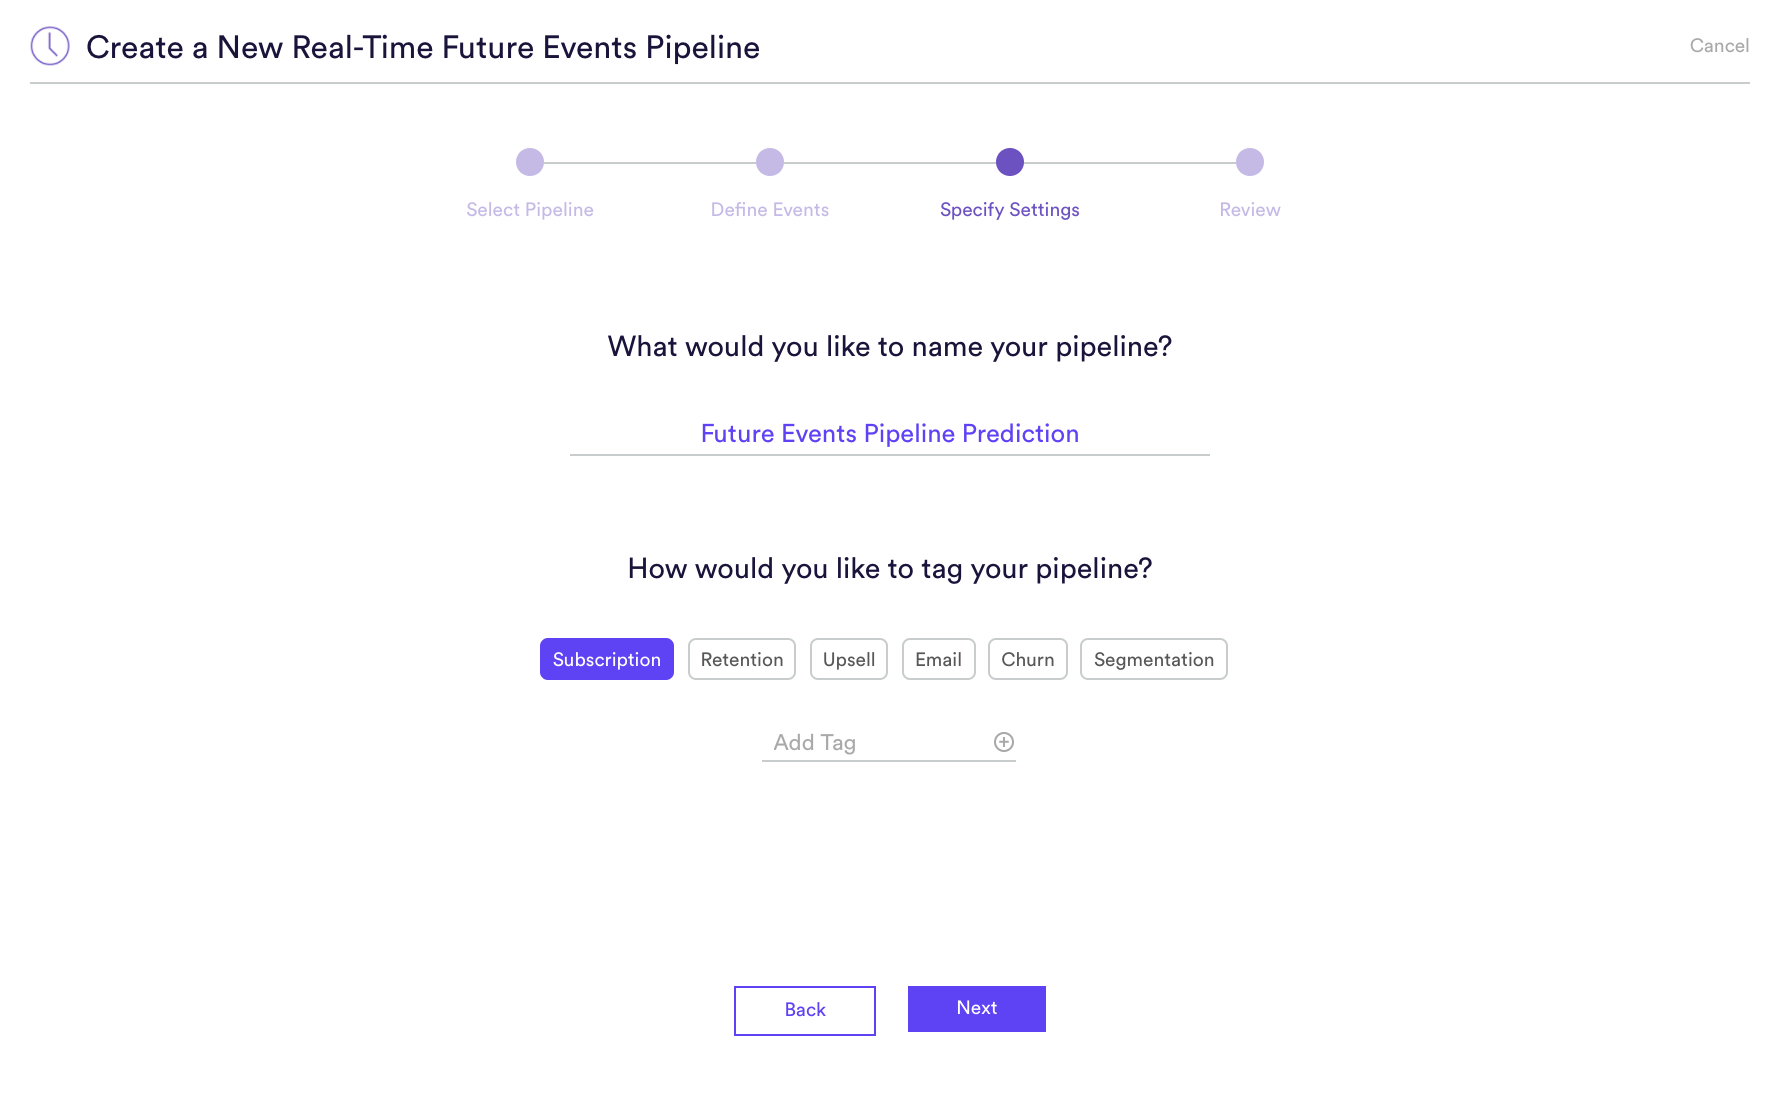
Specify settings such as your pipeline’s name, schedule, tags, and more.
Every time your pipeline runs, Cortex goes through the end-to-end process of generating fresh predictions from the latest data that’s been ingested. If you’d like to power automation based on predictions that are always up-to-date, make sure your pipeline is set to run repeatedly. If you’re just testing things out or building a pipeline for one-time use, your pipeline should only run once.
Step 5: Review
The final step is to review your pipeline and ensure all settings look accurate! If anything needs updated, simply go ‘Back’ in the workflow and update any step.
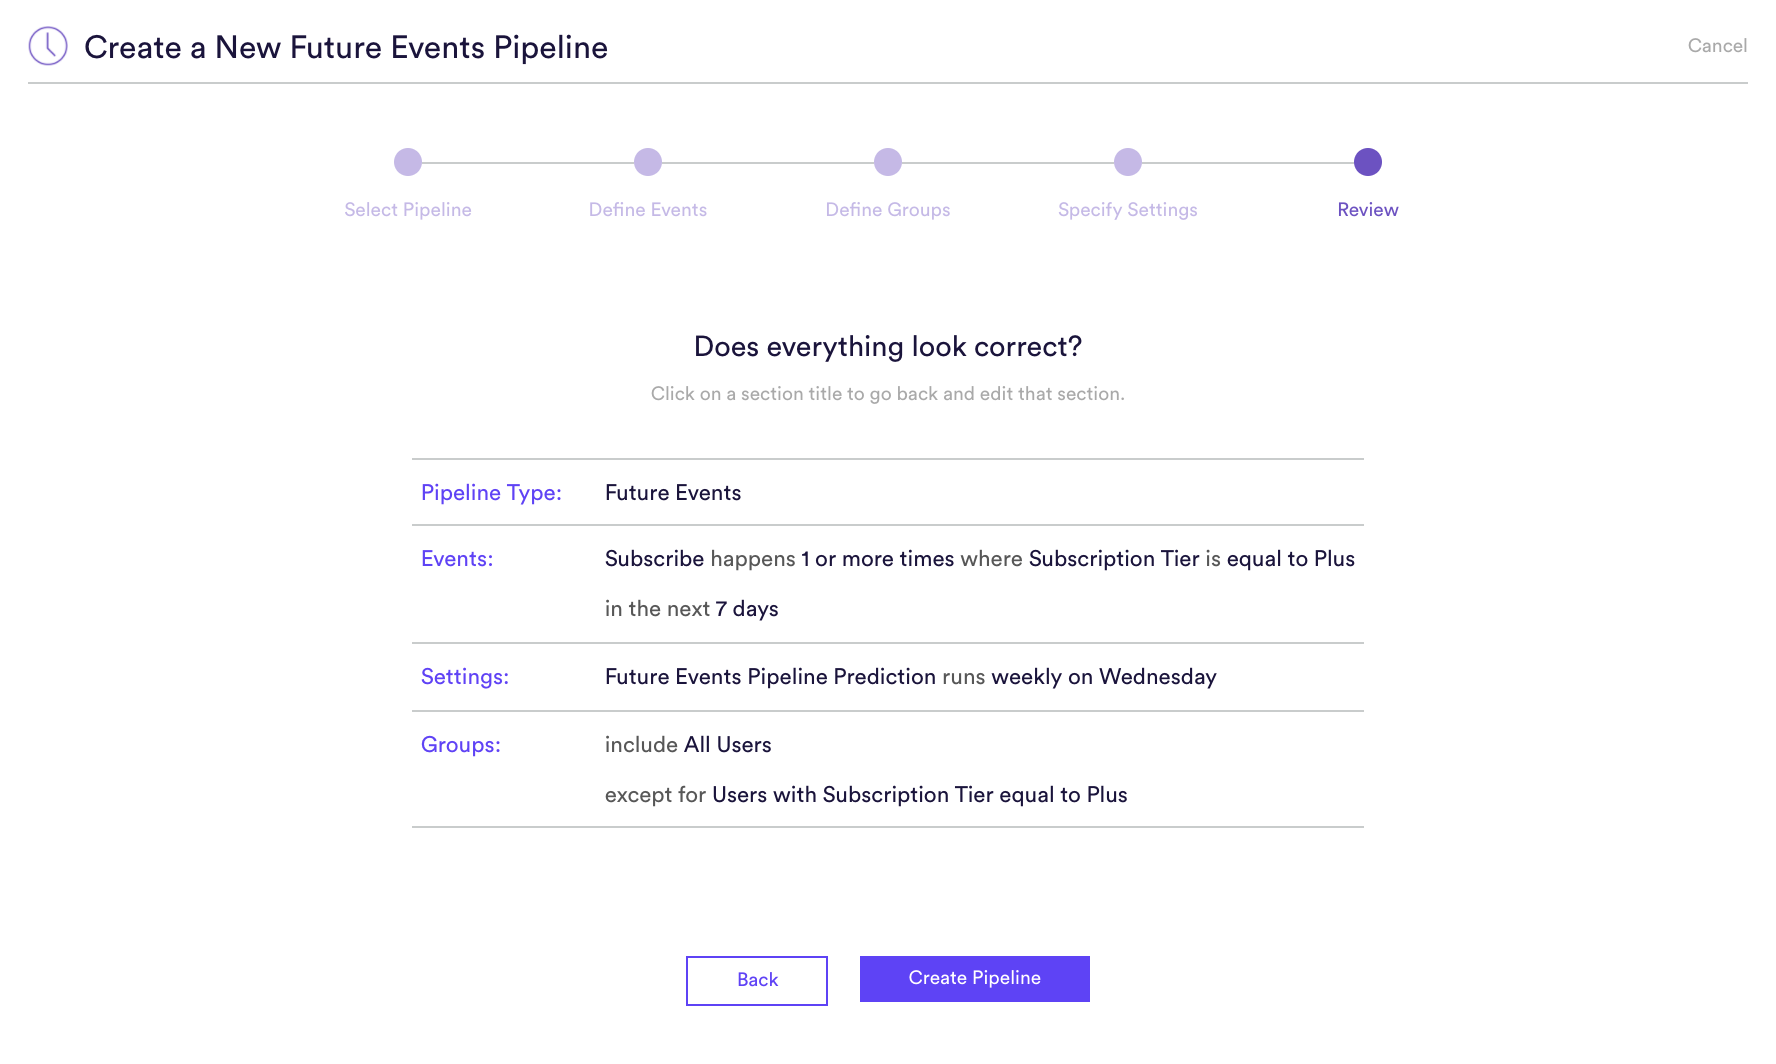
Once you hit “Start”, your pipeline will automatically begin training. Depending on how much data is flowing through your account, it could take up to a few hours for your pipeline to finish running.
Real-Time Future Events
How to build a Real-Time Future Events pipeline
Step 1: Choose Pipeline Type
Select ‘Create New Pipeline’ from within your Cortex account. Make sure that the “Batch | Real-Time” toggle is set to “Real-Time”, and choose the Future Events pipeline type.
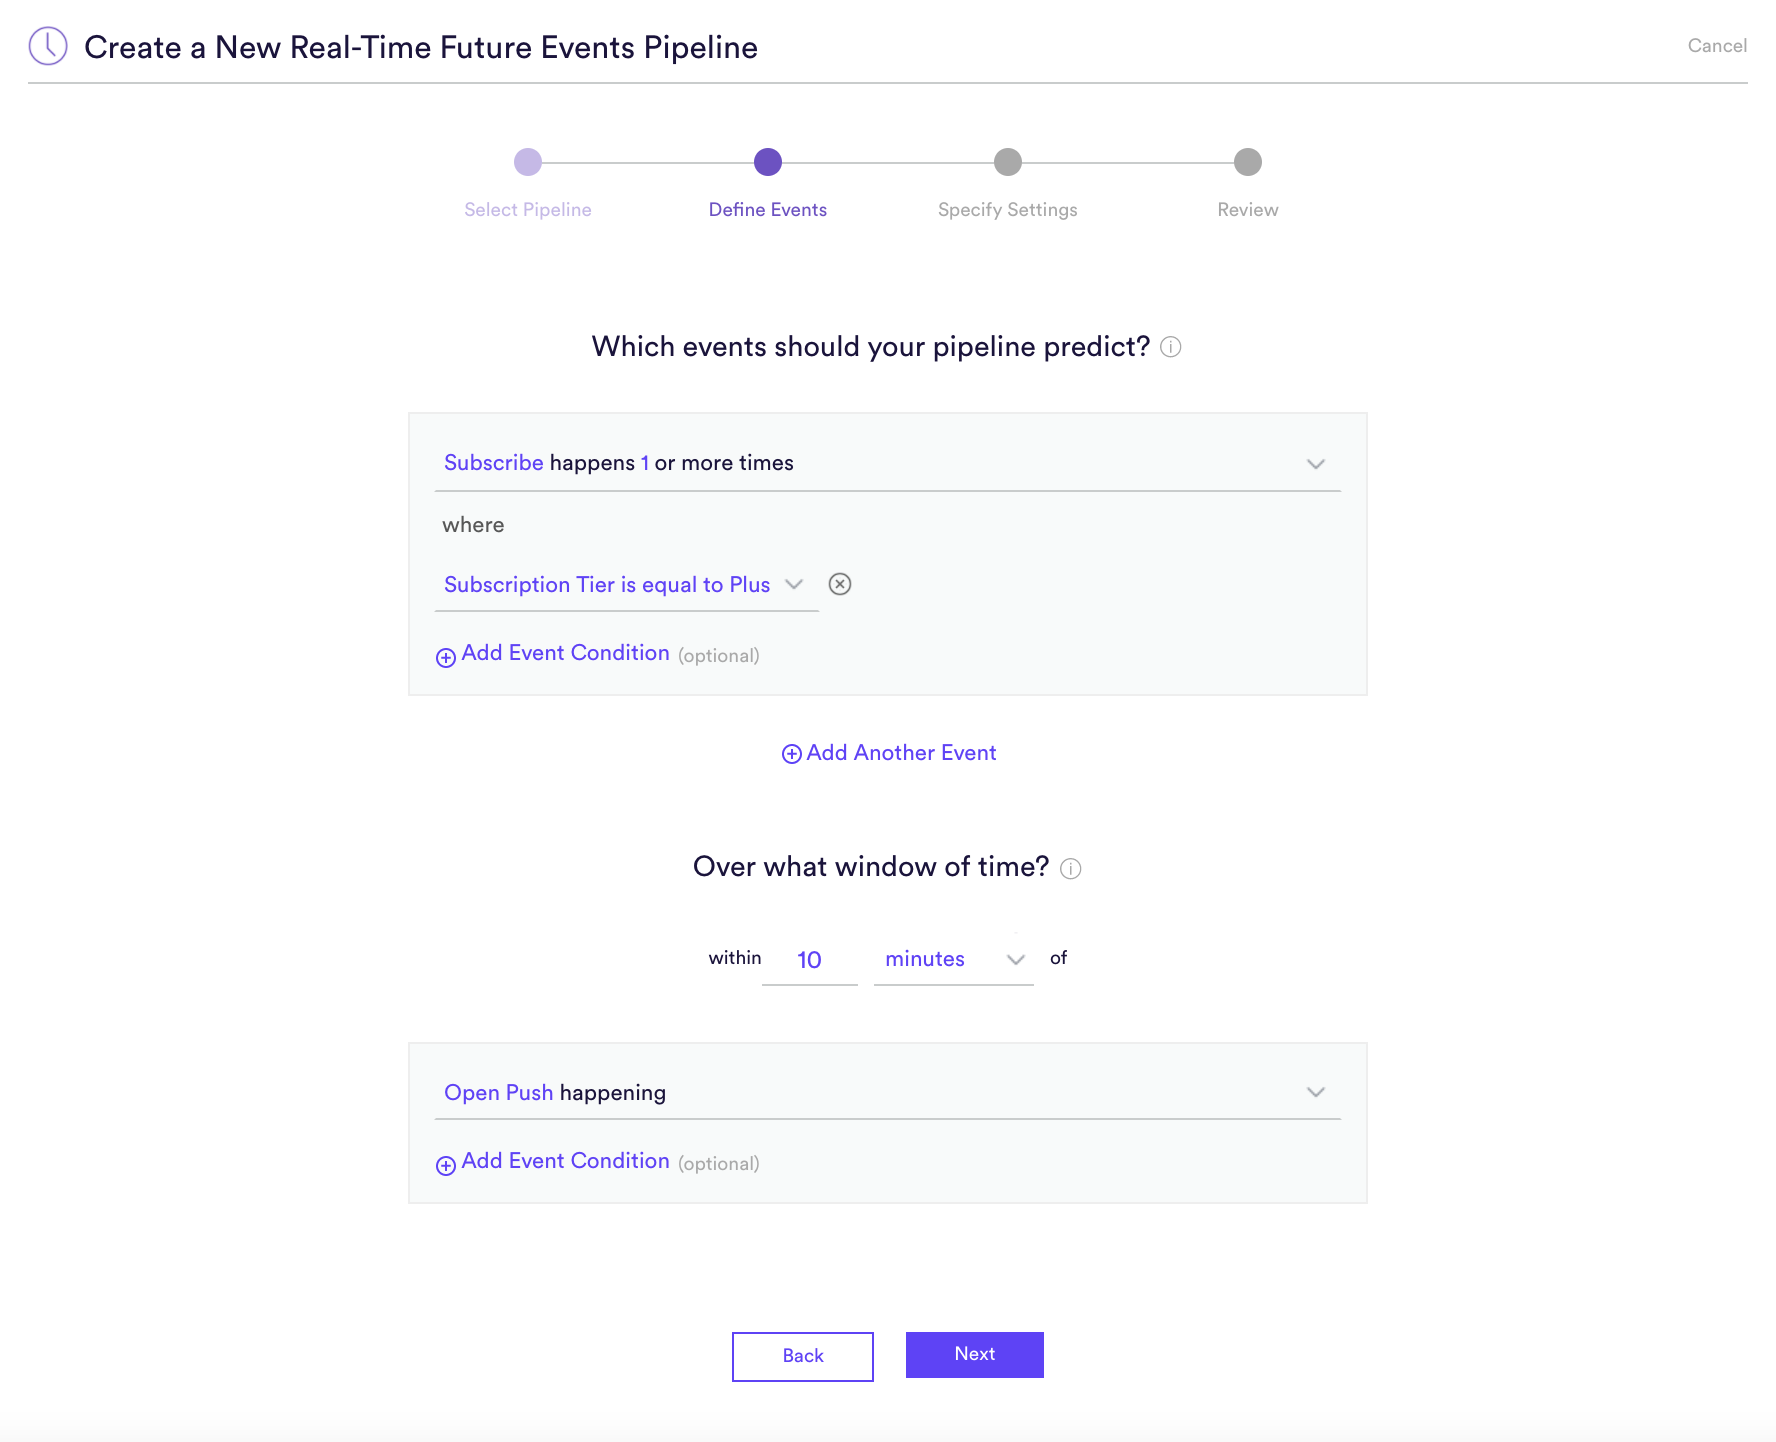
Step 2: Define Events
Future Events pipelines are used to predict the probability that some event happens in the future for each of your data points. Defining that event means providing four pieces of information to Cortex: (A) happens (B) or more times where (C) within (D) days.
- (A) Event Type: The type of event that Cortex should predict. These event types are based on the data being ingested into Cortex.
- (B) Frequency: The minimum number of times the event must occur in order to count as a conversion. The default value is “1”, i.e. you are only predicting that a user will take this action once in the specified time range. However, if you are looking to predict if users will do an event multiple times, e.g. Predict how likely each user is to make 5 purchases, then you can increase the event frequency.
- (C) Event Conditions: Conditions (if any) under which the event must occur in order to count as a conversion. These event conditions are based on the data being ingested into Cortex.
- (D) Timeframe: The future window of time over which the event(s) should be predicted. For a real-time Future Events pipeline, this window is triggered separately for each user by an action or intervention. Specify both the length of your window (in seconds, minutes, hours, or days), and the event which identifies your intervention.
You can build a Future Events pipeline to predict any event that you can describe in this way using your data. Add any number of conditions to an event, or chain any number of distinct events together using AND/OR/IF operators. No matter how complex, your events will always read like an English sentence.
Step 3: Specify Settings
Specify settings such as your pipeline’s name and tags. Unlike with a batch pipeline, you don’t need to specify a schedule, since your pipeline’s predictions will be made in real-time and on-demand.
Step 4: Review
The final step is to review your pipeline and ensure all settings look accurate! If anything needs updated, simply go ‘Back’ in the workflow and update any step.
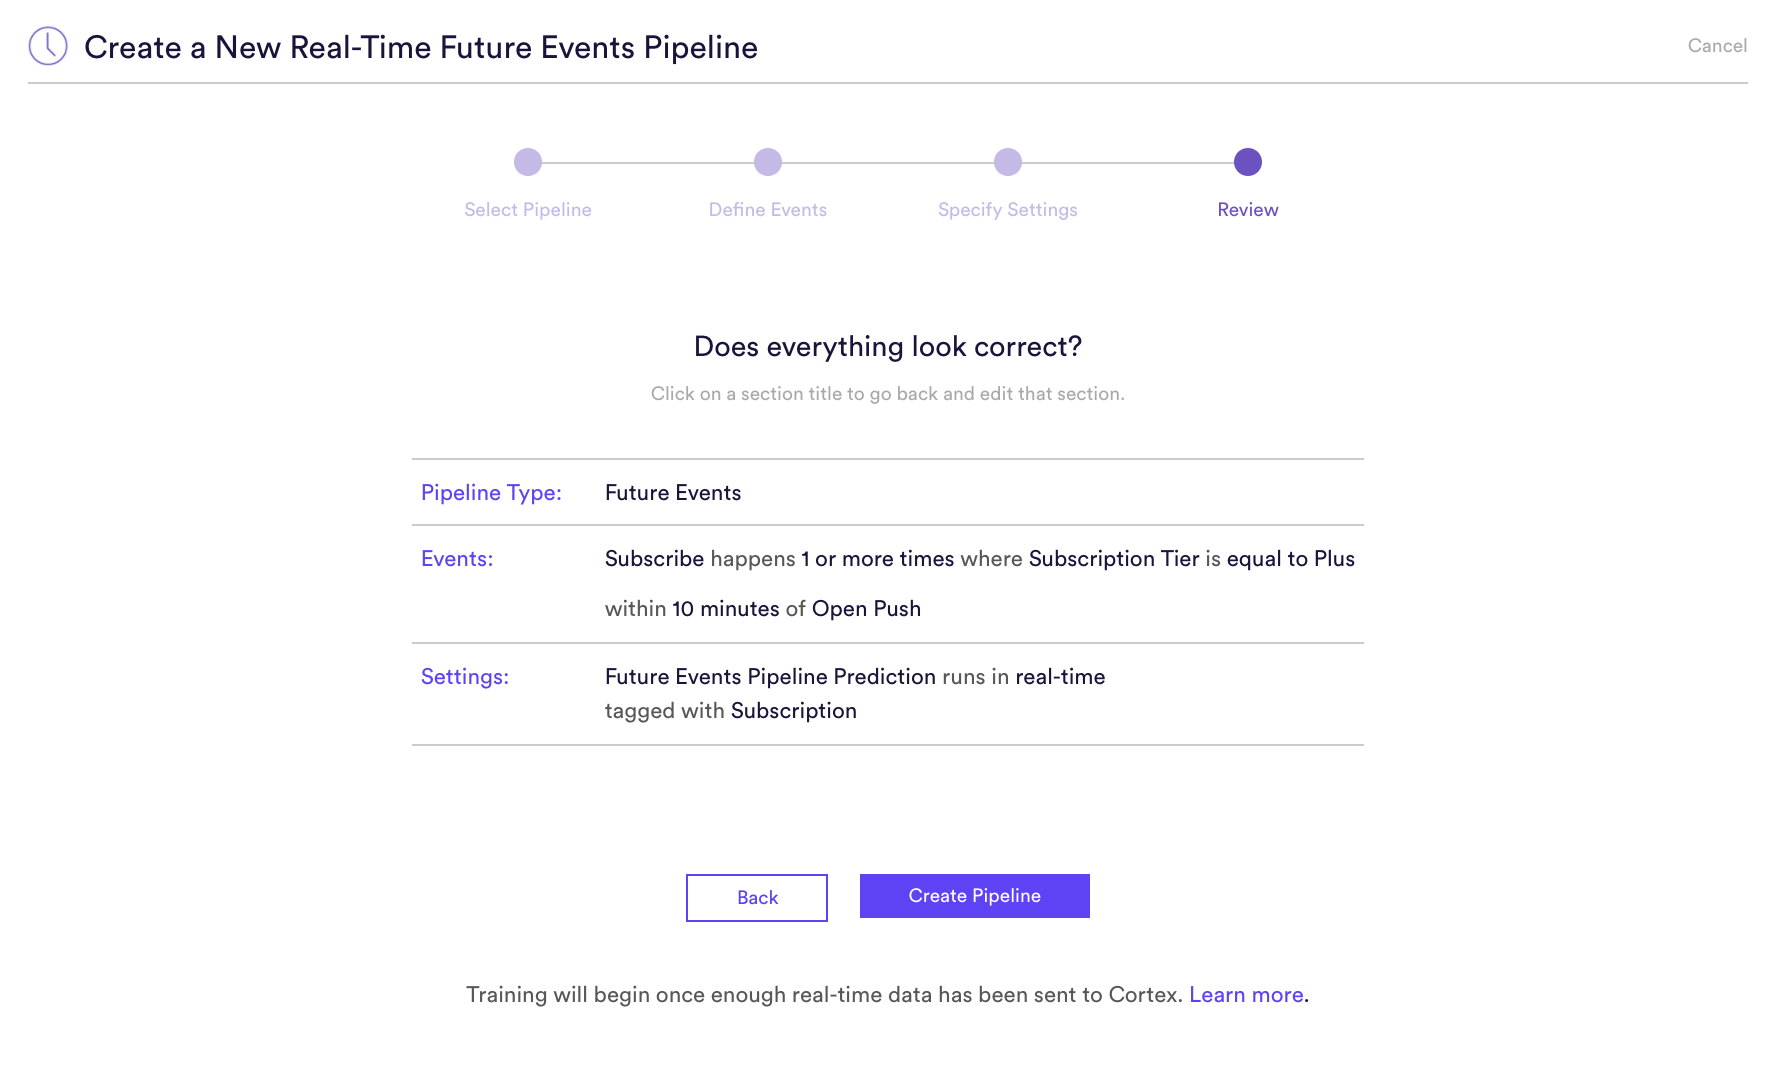
Note that because a Real-Time pipeline must gather additional data from users’ current browsing session, it won’t begin training right away. Instead, it will enter a “Data Collection Period” until enough data has been gathered to initiate training. Click here to learn more about this period, and how to begin sending real-time data to your pipeline.
Related Links
- Future Events Performance
- How to Build an Uplift Pipeline
- How to Build a Look Alike Pipeline
- How to Build a Classification Pipeline
- How to Build a Regression Pipeline
- How to Build a Recommendations Pipeline
Still have questions? Reach out to support@mparticle.com for more info!