How Can We Help?
Behavioral SDK Module
Cortex’s JavaScript SDK provides a robust set of functionality for developers to interface with Cortex directly from the client-side. This document provides an overview of the SDK module related specifically to sending behavioral events.
| Module | Description |
| Identification | Set, generate, and retrieve a unique ID for each of your users. |
| Behavioral | Send behavioral events to Cortex as users browse your site. These events serve as the basis for predictions made by your ML Pipelines. |
| Decision | Deploy your ML Pipelines through a decisioning framework which dynamically determines the right onsite experience to provide each user. These decisions are based on predictions from your ML Pipelines, and can be configured to optimize for conversions, revenue, or more. |
Overview of Behavioral Events
Events Data form the basis for any Machine Learning Pipeline that you build in Cortex. The JavaScript SDK provides a scalable framework for streaming these events to Cortex directly from the client. The more events you send and the more information attached to these events, the more flexibility you will have in building pipelines and the more accurate these pipelines will be.
Behind the scenes, Cortex aggregates event messages into batches to minimize the number of packets that must be sent. This means that a call to send an event may not immediately put a packet on the wire.
The following sections describe how to call various functions contained within the Behavioral module of the JavaScript SDK.
Identifying Users
Before you can send an event to Cortex’s analytics servers, you must set an ID for each user in the client. This ID will be used by Cortex to aggregate all of the user’s prior behavioral data into machine learning features. These features are then used by your ML pipelines to make predictions for each unique user.
The JavaScript SDK’s Identification Module provides various ways to set, generate, and retrieve these unique user ids. Call the setUserId function in order to assign an ID to a given user in the client. Once you have set the userId, any behavioral event sent to Cortex during the user’s session will be automatically associated with that ID.
While setUserId enables you to set only one ID per user, you may send additional IDs for the user (e.g. a cookie) via the params argument when sending events (see the section below on Sending an Event). If you do have more than one identifier for each user, you may also add an ID Mapping data source to Cortex in order to reconcile these disparate IDs into a unified profile for each user.
Sending an Event
The api.send function allows you to send user behavioral events to Cortex’s analytics servers directly from the client. Note that before you begin sending events, you must set an ID for the user. Once you have set this ID, you do not have to include a userId alongside the event, since any event sent during the session will be automatically associated with the user.
Request
api.send(eventType, itemIds, params)
Parameters
| Parameter | Type | Description |
| eventType | string | The type of event that has occurred. |
| itemIds | string | A single string-valued item ID, or an array of string-valued item IDs, associated with the event. If there are no item IDs associated with the event, set this value to null. |
| params | hash | Optionally, include a hash containing key-value pairs for any other information pertaining to your event. These fields can describe the user completing the event (e.g. subscriber_status=premium), the item/page on which the event was recorded (content_type=article), or conditions of the event itself (device=mobile). |
Examples: Array Arguments
Sending a purchase event for the item “ABC” to Cortex’s servers using array arguments push syntax might look like:
window.vidora.push(["send", "purchase", "ABC", {params: {device:"mobile", sale_price:49.99, cookie_id:"xyz"}}]);
Sending purchase events for two items (say, items “ABC” and “DEF” were both checked out of the same cart) might look like this, using push syntax:
window.vidora.push(["send", "purchase", ["ABC","DEF"], {params: {device:"mobile", sale_price:49.99, cookie_id:"xyz"}}]);
Sending a pageview event (not associated with an item ID) might look like:
window.vidora.push(["send", "pageview", null, {params: {page_url:"www.example.com/sports_articles/", section:"sports", cookie_id:"xyz"}}]);
Examples: Closures
Sending a purchase event for the item “ABC” to Cortex’s servers using closure syntax might look like:
window.vidora.ready(function(api) {
   api.send("purchase", "ABC", {params: {device:"mobile", sale_price:49.99, cookie_id:"xyz"}});
});
Sending purchase events for two items (say, items “ABC” and “DEF” were both checked out of the same cart) might look like this, using push syntax:
window.vidora.ready(function(api) {
   api.send("purchase", ["ABC","DEF"], {params: {device:"mobile", sale_price:49.99, cookie_id:"xyz"}});
});
Sending a pageview event (not associated with an item ID) might look like:
window.vidora.ready(function(api) {
   api.send("pageview", null, {params: {page_url:"www.example.com/sports_articles/", section:"sports", cookie_id:"xyz"}});
});
Recording an Event without Sending
The api.notify function allows you to record user behavioral events in the client without sending them to Cortex’s analytics servers. This functionality is useful if you are already sending behavioral events from the server (e.g. through Cortex’s Behavioral API or Segment integration), but would like to make client-side decisions based results from a real-time ML pipeline. The api.notify function accomplishes this by recording client-side events so that real-time decisions can incorporate behavior from the current session, while ensuring that duplicate events are not sent to Cortex from both the client and the server.
Note that events which indicate that a particular treatment was administered based on a decision returned by the Decision SDK Module must be sent to Cortex’s analytics servers, not just recorded in the client.
Before you begin recording events, you must set an ID for the user. Once you have set this ID, you do not have to include a userId alongside the event, since any event recorded during the session will be automatically associated with the user.
Request
api.notify(eventType, itemIds, params)
Parameters
| Parameter | Type | Description |
| eventType | string | The type of event that has occurred. |
| itemIds | string | A single string-valued item ID, or an array of string-valued item IDs, associated with the event. If there are no item IDs associated with the event, set this value to null. |
| params | hash | Optionally, include a hash containing key-value pairs for any other information pertaining to your event. These fields can describe the user completing the event (e.g. subscriber_status=premium), the item/page on which the event was recorded (content_type=article), or conditions of the event itself (device=mobile). |
Examples: Array Arguments
Recording a purchase event for the item “ABC” using array arguments push syntax might look like:
window.vidora.push(["notify", "purchase", "ABC", {params: {device:"mobile", sale_price:49.99, cookie_id:"xyz"}}]);
Recording a pageview event (not associated with an item ID) might look like:
window.vidora.push(["notify", "pageview", null, {params: {page_url:"www.example.com/sports_articles/", section:"sports", cookie_id:"xyz"}}]);
Examples: Closures
Recording a purchase event for the item “ABC” using closure syntax might look like:
window.vidora.ready(function(api) {
   api.notify("purchase", "ABC", {params: {device:"mobile", sale_price:49.99, cookie_id:"xyz"}});
});
Sending a pageview event (not associated with an item ID) might look like:
window.vidora.ready(function(api) {
   api.notify("pageview", null, {params: {page_url:"www.example.com/sports_articles/", section:"sports", cookie_id:"xyz"}});
});
Sending Impression Data for Recommendations
If you’d like to generate personalized item recommendations for each user, your events must contain an item ID indicating which item the user interacted with. Additionally, you should also be sure to send impression events (i.e. “shown”) to indicate when a user is exposed to an item.
When sending “shown” events, Cortex recommends adhering to the following best practices, which are based on guidelines from the Interactive Advertising Bureau.
- A ‘shown’ event should only be sent if at least 50% of the item is visible for at least 1 second.
- A ‘shown’ event should only be sent once per item per page load.
The sample code below is designed to send shown events in the suggested manner for items within a module.
// Get the slots and create a handler that listens for visibility changes.
function getHtmlElements() {
  // Create a function to grab HTML elements that contain the module slots.
}

var itemElements = getHtmlElements();
var handler = createVisibilityChangeHandler(itemElements, vidoraAPI);

window.addEventListener('DOMContentLoaded', handler);
window.addEventListener('load', handler);
window.addEventListener('scroll', handler);
window.addEventListener('resize', handler);

// Call the handler manually.
handler();

// Set the amount of time that an item must be visible in order for a shown event to occur to 1000 milliseconds.
var SHOWN_DWELL_DURATION = 1000;

// Set the percent of pixels that must be visible on the page to count as an impression to 50%.
var SHOWN_PIXEL_PERCENT  = 0.5 - 0.0000001;

// When the visibility changes (scrolls, resizes, content loaded), check to see whether slots are visible and if so, fire off a shown event.
function createVisibilityChangeHandler(itemElements, vidoraAPI) {
  return function() {
    for (var i = 0; i < itemElements.length; i++) {
      var slot = itemElements[i];
      // Only send a shown event for the slot if it is visible and an event hasn't already been sent.
      if (!slot.shownSent && slotIsVisible(slot)) {
        // Send the shown event only after enough time has passed during which the slot is still visible. Clear the timeout if it is no longer visible, and wait if the slot already has a timeout on it.
        if (slot.timeout) {
          // Create a handler to send the shown event, and set a timeout of 1 second.
          var shownHandler = createSendShownEventHandler(slot, vidoraAPI);
          slot.timeout = window.setTimeout(shownHandler, SHOWN_DWELL_DURATION);
        }
      }
      else if (slot.timeout) {
        // If the slot has a timeout, but it is no longer visible, clear the timeout.
        window.clearTimeout(slot.timeout);
        delete slot.timeout;
      }
    }
  }
}

// Create a handler for sending a shown event so we don't run into the for loop closure problem where the variables aren't scoped properly.
function createSendShownEventHandler(slot, vidoraAPI) {
  return function() {
    // Retrieve the content id from the item element. The getAttribute() method is the recommended method of retrieving the content id, but you may retrieve it any way you wish, including an asynchronous approach.
    var contentID = slot.getAttribute("data-id");
    var position = slot.getAttribute("data-position");
    vidoraAPI.send("shown", contentID, {
      params {
        group_id: "GROUP_ID" // Set the group_id to a unique identifier for each module
        position: position,
        cookie_id: vidoraAPI.getUUID()
      }
    });
    // Mark the slot as shown.
    slot.shownSent = true;
  };
}

// Returns whether the slot is visible on the page by checking first whether the document is hidden and then checking whether the element is in the viewport.
function slotIsVisible(slot) {
  return (!document.hidden && isElementInViewport(slot));
}

// Determine if an element is within the viewport by calculating the area of overlap between the rectangle defined by the window viewport and element's bounding rectangle relative to the viewport. The element is considered visible if at least a percent of the area is visible within the viewport, or if larger than the viewport, at least a percent of the viewport contains the item.
function isElementInViewport(htmlElement) {
  var rect = htmlElement.getBoundingClientRect();
  var elementArea = rect.width * rect.height;
  var viewportWidth = window.innerWidth;
  var viewportHeight = window.innerHeight;
  var viewportArea = viewportWidth * viewportHeight;
  var overlapX = calculateOverlap(0, viewportWidth, rect.left, rect.right);
  var overlapY = calculateOverlap(0, viewportHeight, rect.top, rect.bottom);
  var overlapArea = overlapX * overlapY;
  return overlapArea > SHOWN_PIXEL_PERCENT * Math.min(elementArea, viewportArea);
}

// Helper function to calculate the overlap between two intervals. Returns 0 if no overlap.
function calculateOverlap(min0, max0, min1, max1) {
  return Math.max(0, Math.min(max0, max1) - Math.max(min0, min1));
}
Integrating with Google Tag Manager
The JavaScript API can be implemented using tag management systems such as Google Tag Manager (GTM). GTM allows you to collect behavioral data from the client and send it to Cortex without having to insert Cortex snippets directly into your front-end code.
The key elements of GTM are described below:
- The Data Layer is a JavaScript object that acts as a virtual layer of your website where information is stored and sent to GTM, so that it may later be transferred to Cortex. Variables are used to capture information from your webpages. As behavioral events occur, information about these events are stored in variables and sent to the data layer.
- Tags are code snippets used to report behavioral events from the data layer to Cortex using JavaScript API functions.
- Triggers are used to observe behavioral events sent to the data layer and decide which tags, if any, should be run in response.
Google Tag Manager uses these to automatically check whether actions being taken by users on your webpage match the events specified in your triggers. If a match occurs and a trigger is fired, GTM will execute tags associated with that trigger to send behavioral data to Cortex.
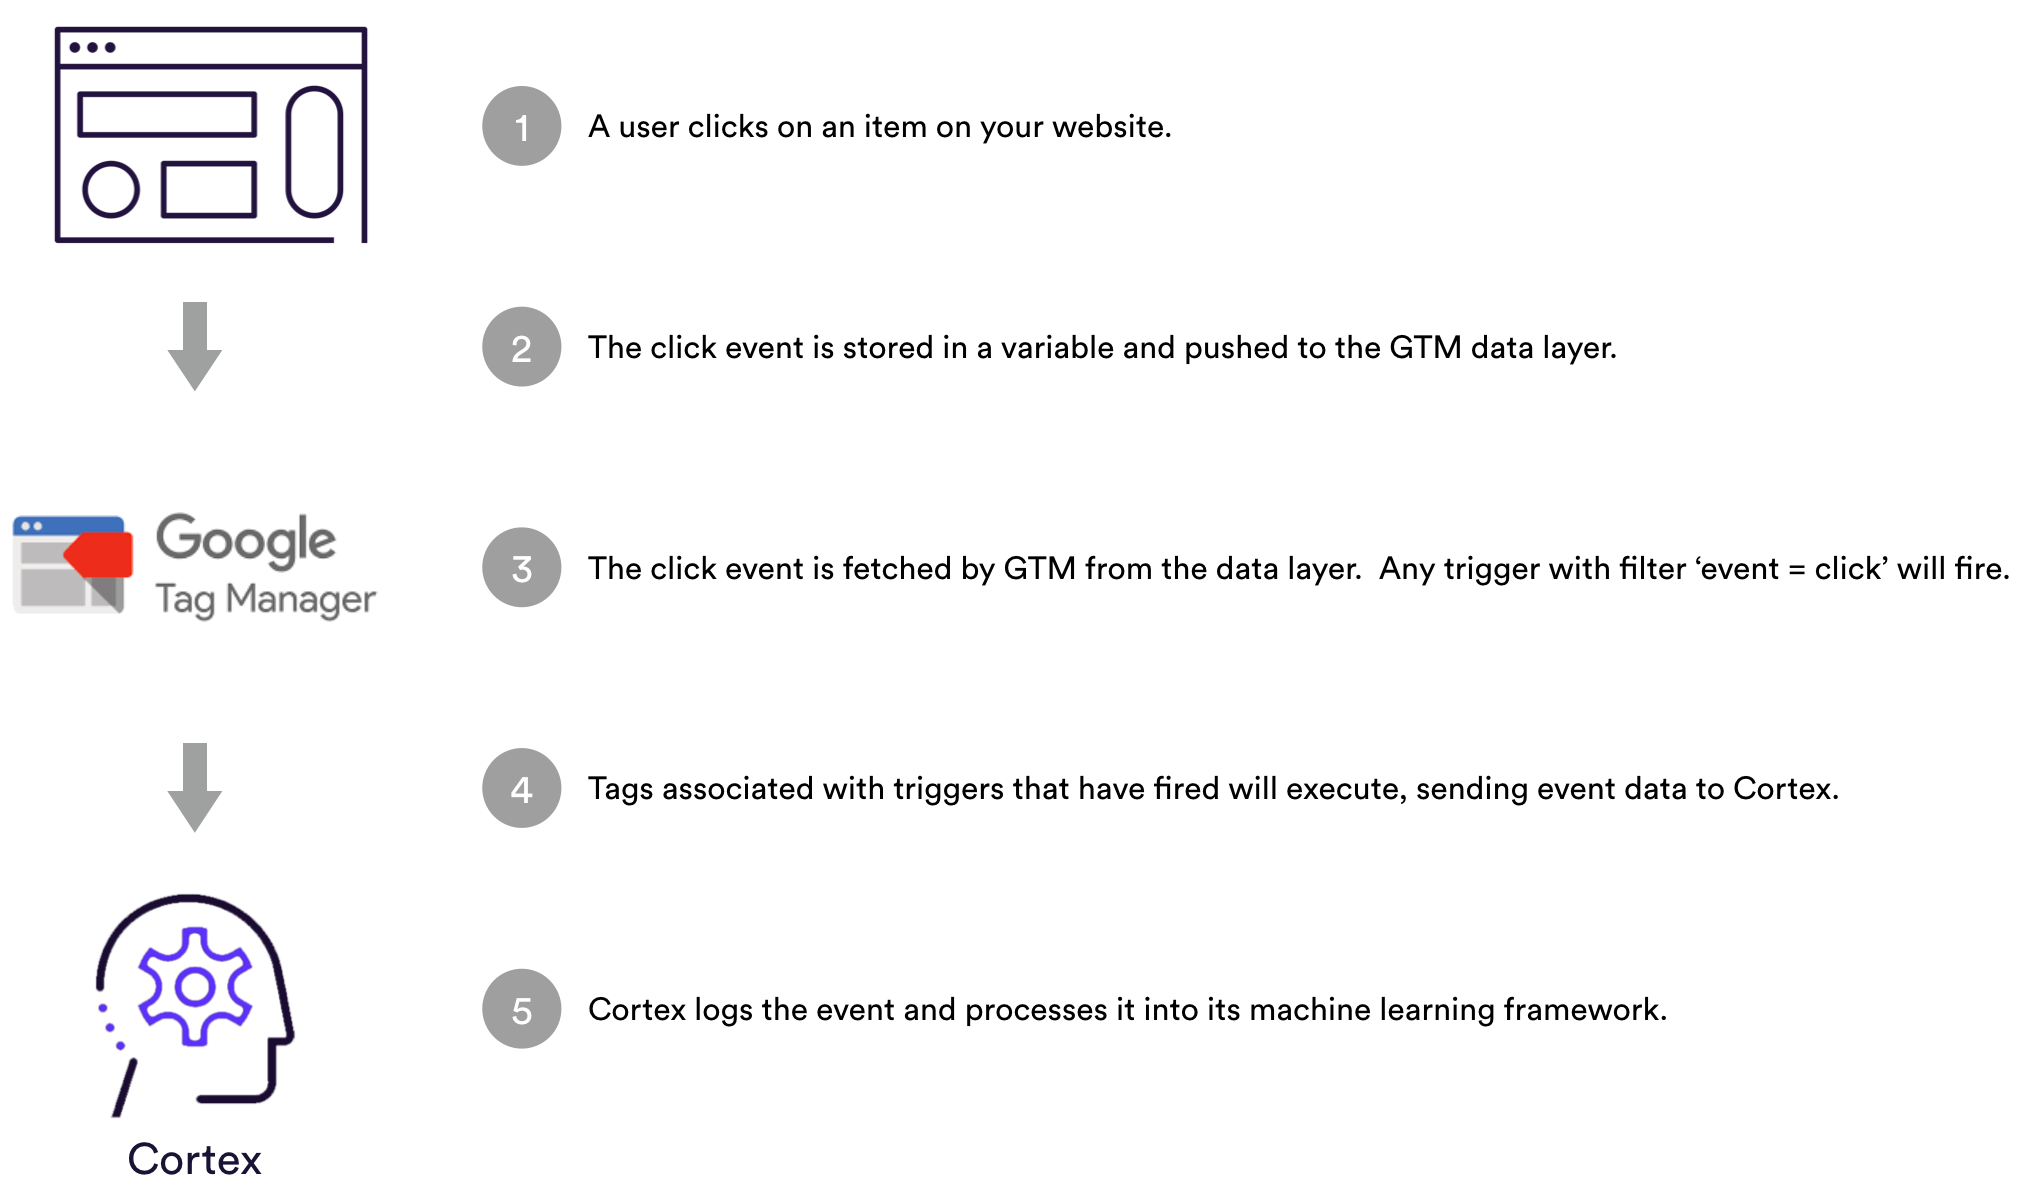
The steps outlined below (1-4) provide instructions for integrating the JavaScript API with GTM.
Step 1: Define data layer variables
Define the variables to be stored in your GTM data later. These variables contain information that you would like to collect from your webpage and pass to GTM.
Built-In Variables
GTM comes equipped with several built-in variables that you may configure to include in your data layer. To send behavioral events to Cortex, the built-in ‘Event’ variable is required. Depending on your use cases, other built-in variables you may want to configure include:

User-Defined Variables
GTM also allows you to defined custom variables in order to send additional information to the data layer. Please see the Sending an Event section for details about the required and optional parameters available to define as variables and send alongside each event. Note that the required ‘type’ parameter should be configured as the built-in ‘Event’ variable (see above), not a user-defined variable.
Sending Treatment Decisions
If you are planning to send events which iindicate that a particular treatment was administered based on a decision returned by the Decision SDK Module, you must configure the following five user-defined variables:
- predictionId
- predictionScore
- predictionPercentile
- action
- explorationCohort
Step 2: Send events through the data layer
First, set up your data layer by including the following snippet at the head of your webpage.
<script>
   dataLayer=[];
</script>
The data layer snippet must be placed above any GTM container code, since GTM must fetch variables from the data layer before evaluating any triggers or executing any tags.
Once the data layer is configured, send event data from your front-end to your data layer, where it may be collected by GTM and routed to the JavaScript API.
Sending User Events
Example Click Event
<script>
  dataLayer.push({
    "event": "click",
    "item_id": "abc"
  });
</script>
The above example snippet should be executed when the user clicks on item “abc”. The built-in ‘Event’ variable and user-defined ‘item_id’ variable must be declared prior to sending this event to the data layer.
When sending shown events for a list of items, data should be consolidated in an array so as to minimize the number of pushes required.
Example Shown Events
<script>
  dataLayer.push({
    "event": "shown",
    "item_id": ["123", "456", "789"]
  });
</script>
The above example snippet should be executed when the user is shown three items with item_ids “123”, “456”, and “789”. The built-in ‘Event’ variable and user-defined ‘item_id’ variable must be declared prior to sending these events to the data layer.
Sending Treatment Decisions
If you are sending an event which indicates a treatment decision as dictated by the Decision SDK Module, call the “tieEventToDecision” function on your Decision object, and push the results into the data layer. This function handles the task of tying your treatment event to the pipeline that was used to generate the decision about whether or not to treat the user.
Example Treatment Event
<script>
  dataLayer.push(decision.tieEventToDecision{
    "event": "shown_paywall",
    "device": "mobile",
    "referrer": "www.example.com"
  });
</script>
The above example snippet should be executed when the user is shown a paywall based on a decision returned by the Decision SDK Module. The built-in ‘Event’ variable and user-defined ‘device’ and ‘referrer’ variables must be declared prior to sending these events to the data layer.
Step 3: Create event triggers
Once you’ve configured your front end to push variables onto the data layer when events occur, you may now set up triggers to listen for certain events. When a variable with the value specified by your trigger is passed to the data layer, the trigger evaluates to true and prompts certain tags to run.
Example Click Event Trigger
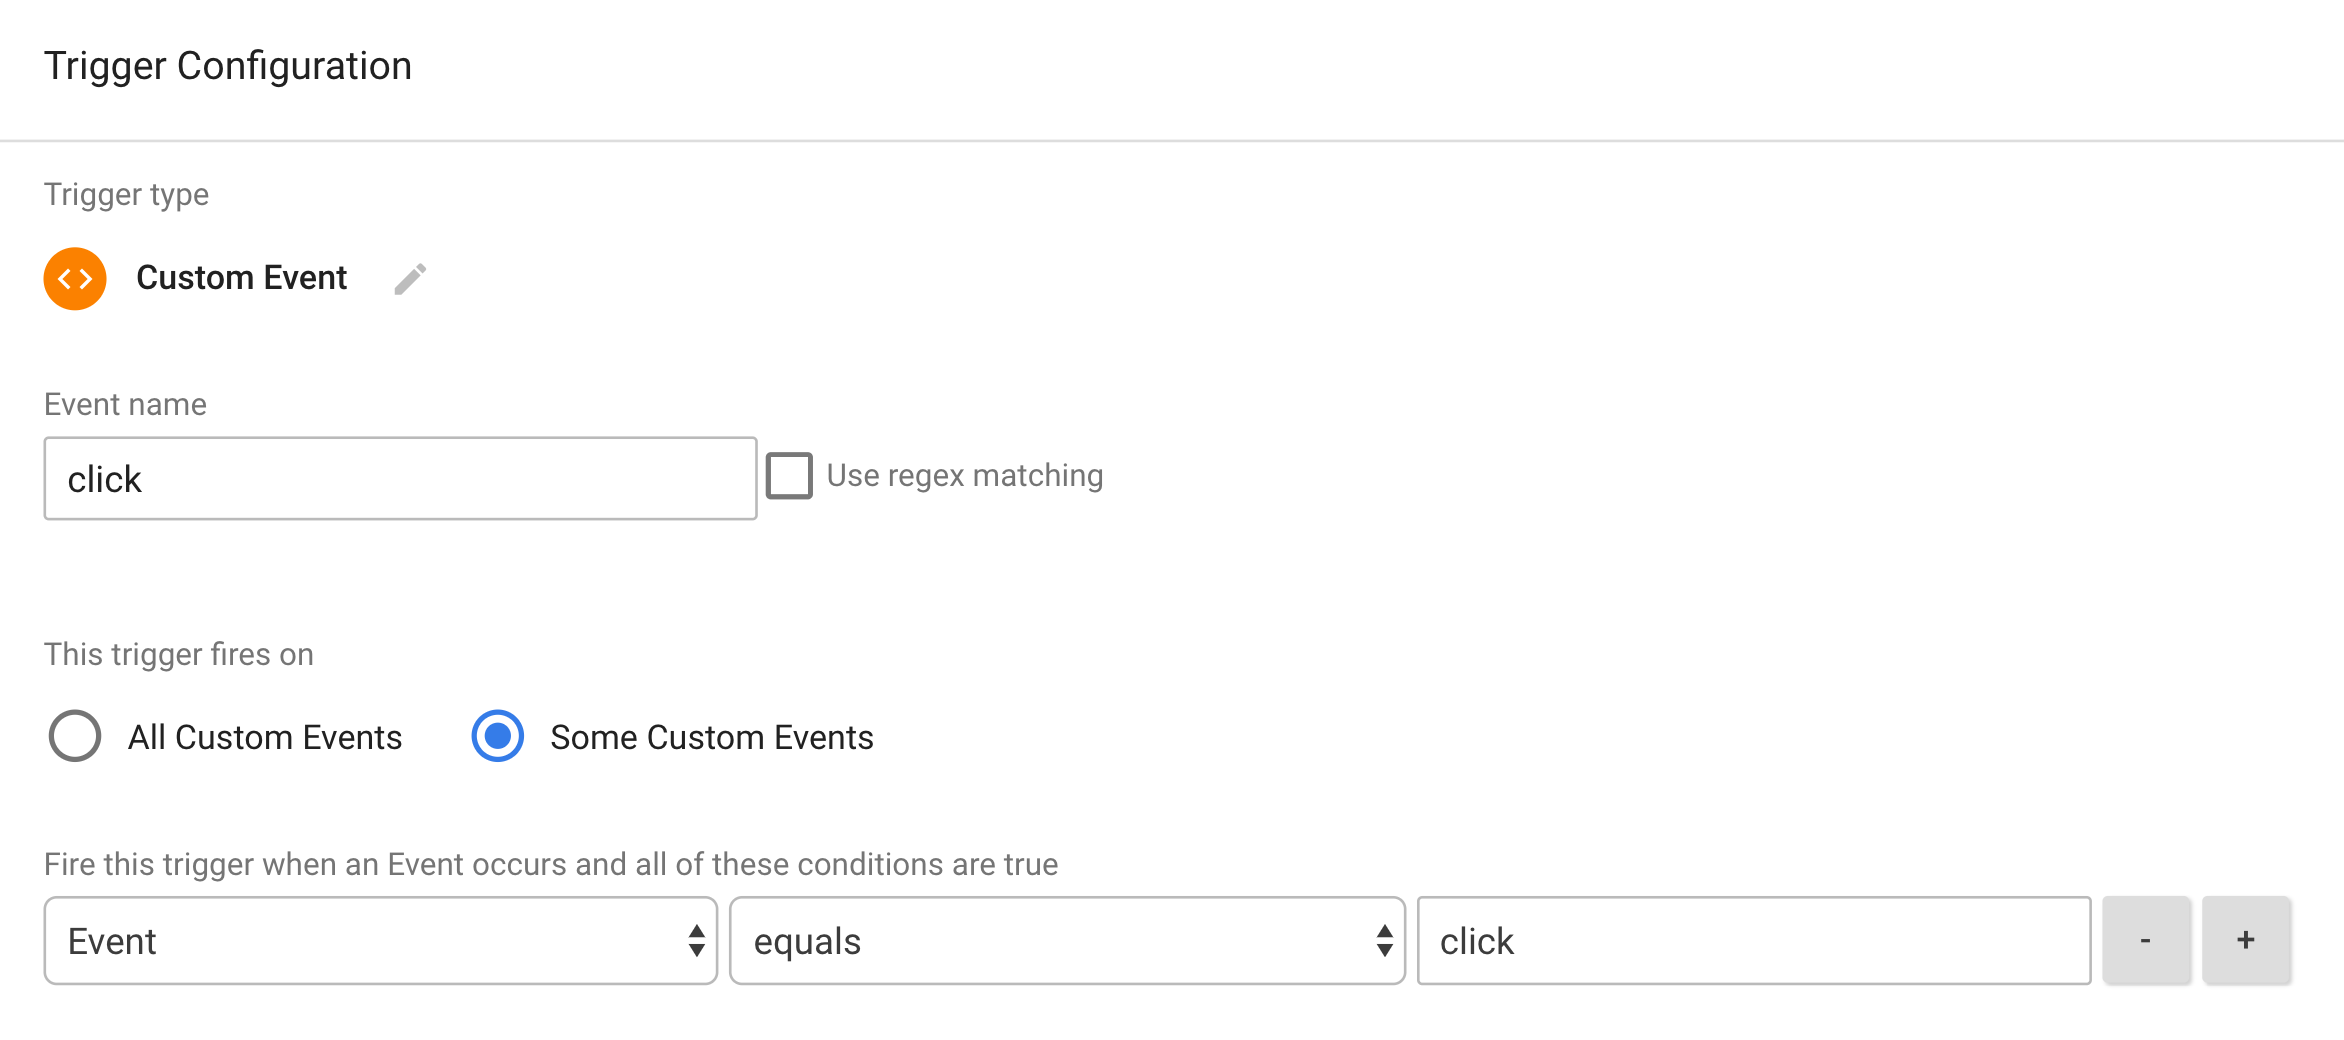
The above example trigger specifies that the built-in ‘Event’ variable must be sent to the data layer with value “click” in order for tags associated with this trigger to execute. In the next step, we will create a ‘Cortex Click Event’ tag which will run when this ‘Click Event’ trigger is fired.
A trigger should be defined for each event type that you plan to send to Cortex (e.g. pageview, purchase, click, shown, login, etc.).
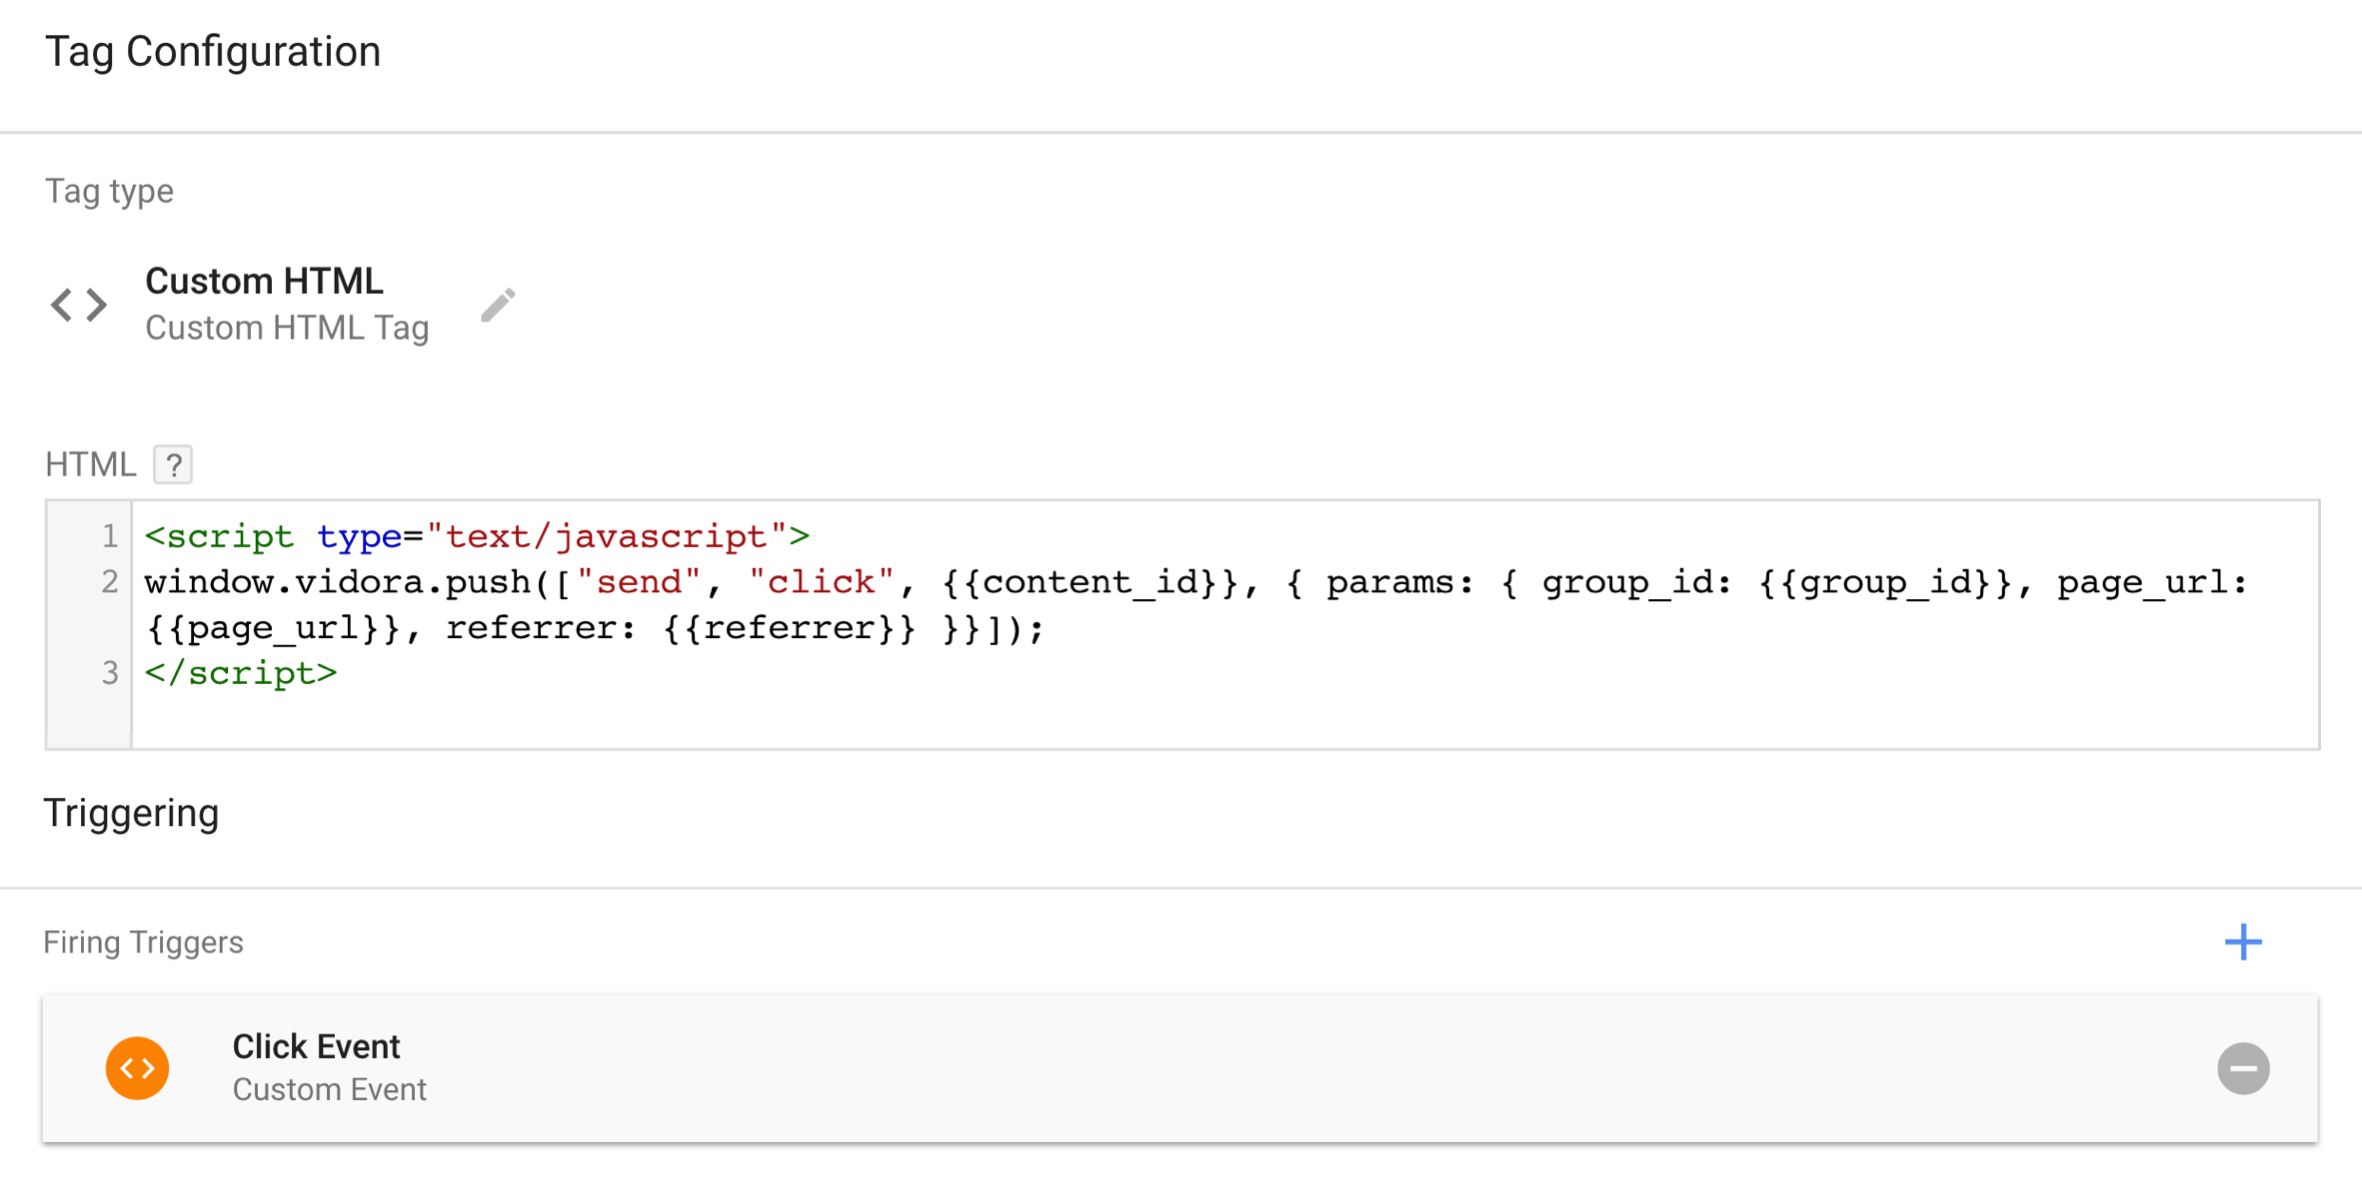
Step 4: Create tags
Now that you’ve set up your triggers, create tags which will execute when a trigger’s firing criteria are met. Your tags will use Cortex’s JavaScript API functions to send information from GTM to Cortex when the associated trigger is fired.
Load Cortex Snippet
First create a tag to load the Cortex JavaScript SDK, set the userId, and send pageview events on every webpage. This tag should be associated with the ‘All Pages’ firing trigger to ensure that it is run across your entire site. The script that must be loaded is:
<script src="https://assets.vidora.com/js/vidora-client.1.2.9.min.js" type="text/javascript"></script>

<script>(function(a,b,c,d,e){var f={_q:[]};f.ready=f.push=function(a){f._q.push(a)},c in a||(a[c]=f),a[c].ready(function(a,b){b._i(d,e)})})(window,document,"vidora",YOUR_API_KEY);</script>

<script>
  window.vidora.push(["setUserId", "GLOBAL_USER_ID"]);
  window.vidora.push(["send", "pageview", null, { params: { page_hostname: {{page_hostname}}, page_path: {{page_path}}, page_url: {{page_url}}, referrer: {{referrer}} }}]);
</script>
The variables included in the ‘params’ hash depend on which built-in and user-defined variables you would like to attach as metadata to the pageview event. Note that if an id value is not passed to the setUserId function, Cortex will create a cookie with a unique user id (UUID) for the user.
Sending Events
Next create tags associated with each event trigger in order to send event data to Cortex.
The below example tag reports a click event for the user along with the content_id, group_id, page_url, and referrer variables associated with the event. This snippet should be loaded into a tag associated with a trigger that fires when the value of the ‘Event’ variable equals “click”.
<script>
  window.vidora.push(["send", "click", {{content_id}}, { params: { group_id: {{group_id}}, page_url: {{page_url}}, referrer: {{referrer}} }}]);
</script>
Sending Treatment Decisions
If you are sending an event which indicates a treatment decision as dictated by the Decision SDK Module, you must include the following five variables in the params hash of your tag. Note that these variables must have previously been configured as user-defined variables.
- predictionId
- predictionScore
- predictionPercentile
- action
- explorationCohort
<script>
  window.vidora.push(["send", "shown_paywall", null, { params: { predictionId: {{predictionId}}, predictionScore: {{predictionScore}}, predictionPercentile: {{predictionPercentile}}, action: {{action}}, explorationCohort: {{explorationCohort}}, device: {{device}}, referrer: {{referrer}} }}]);
</script>
Related Links
Still have questions? Reach out to support@mparticle.com for more info!